
I was excited to see that TrueNAS SCALE included AMCE DNS-Authenticator. However, iXsystems chose to only include Cloudflare and route53 (aka AWS) DNS API was somewhat of a disappointment. Cloudflare and route53 are not really popular domain providers for personal use. Although Cloudflare is more affordable compared to AWS, it’s still more expensive than most domain providers. I don’t see any reason not to include all the DNS APIs already supported by the AMCE shell script. Even pfSense included all DNS API in pfSense + (pfSense paid product). For a full list of DNS API supported by AMCE shell script, please visit amce.sh official page: https://github.com/acmesh-official/acme.sh/wiki/dnsapi

➡️If you think this tutorial is helpful, please support my channel by subscribing to my YouTube channel or by using the Amazon/eBay/ClouDNS Affiliated links below (Full Disclaimer). I will get a small commission from your purchase to grow my channel:
🚀 ClouDNS Affiliated: https://www.cloudns.net/aff/id/255803/
🚀 Things I used for my server: https://amzn.to/3hudohP
🚀 Tools I used: https://amzn.to/3uXaSUr
🚀 Devices I used: https://amzn.to/3FYlfxk
🚀 Networking/Cybersecurity/Programming Books: https://amzn.to/3HEYwb0
🚀 TrueNAS HBA SAS controller IT Mode from the Art of Server: https://ebay.us/cBWEvJ
🧧 PayPal Donation: https://www.paypal.com/paypalme/sysadmin102
You can watch the tutorial on YouTube for more detailed instructions:

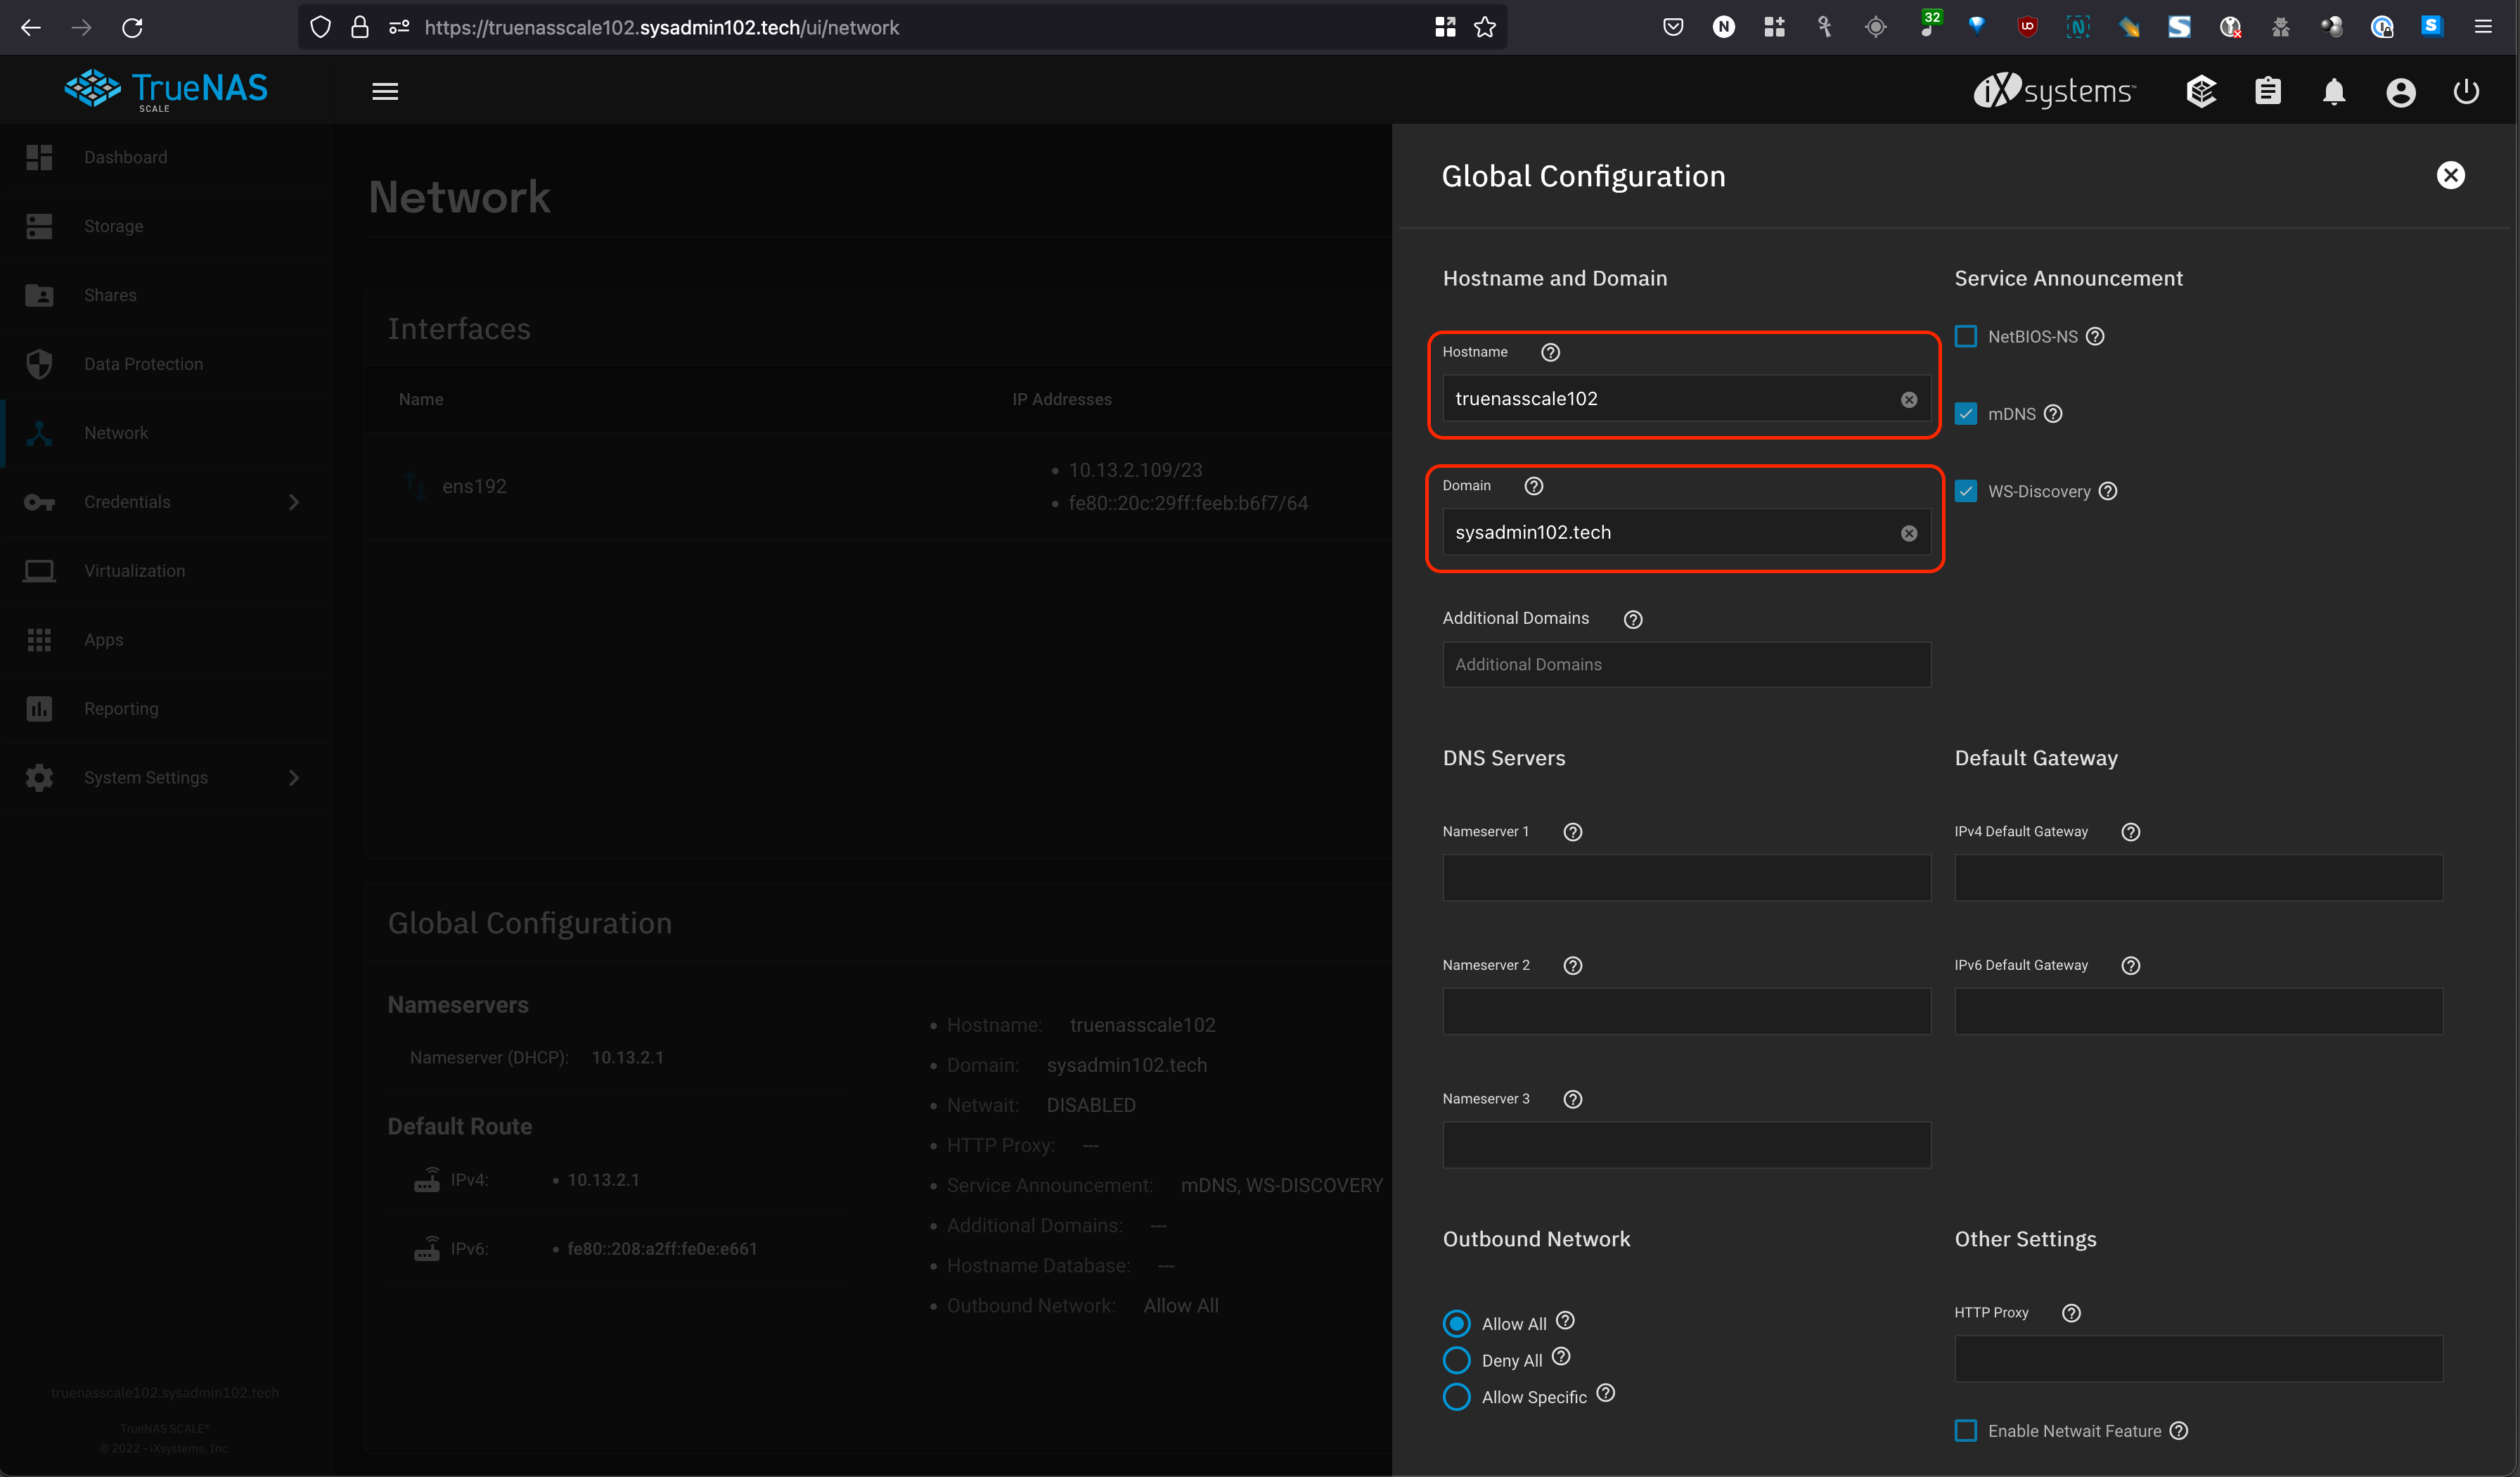
The first step is to update your network setting. Under Network > Global Configuration. You can change your Hostname and Domain from here. By default, the domain name is set as local. You will need to change it to a Fully Qualified Domain Name (FQDN) as shown below:
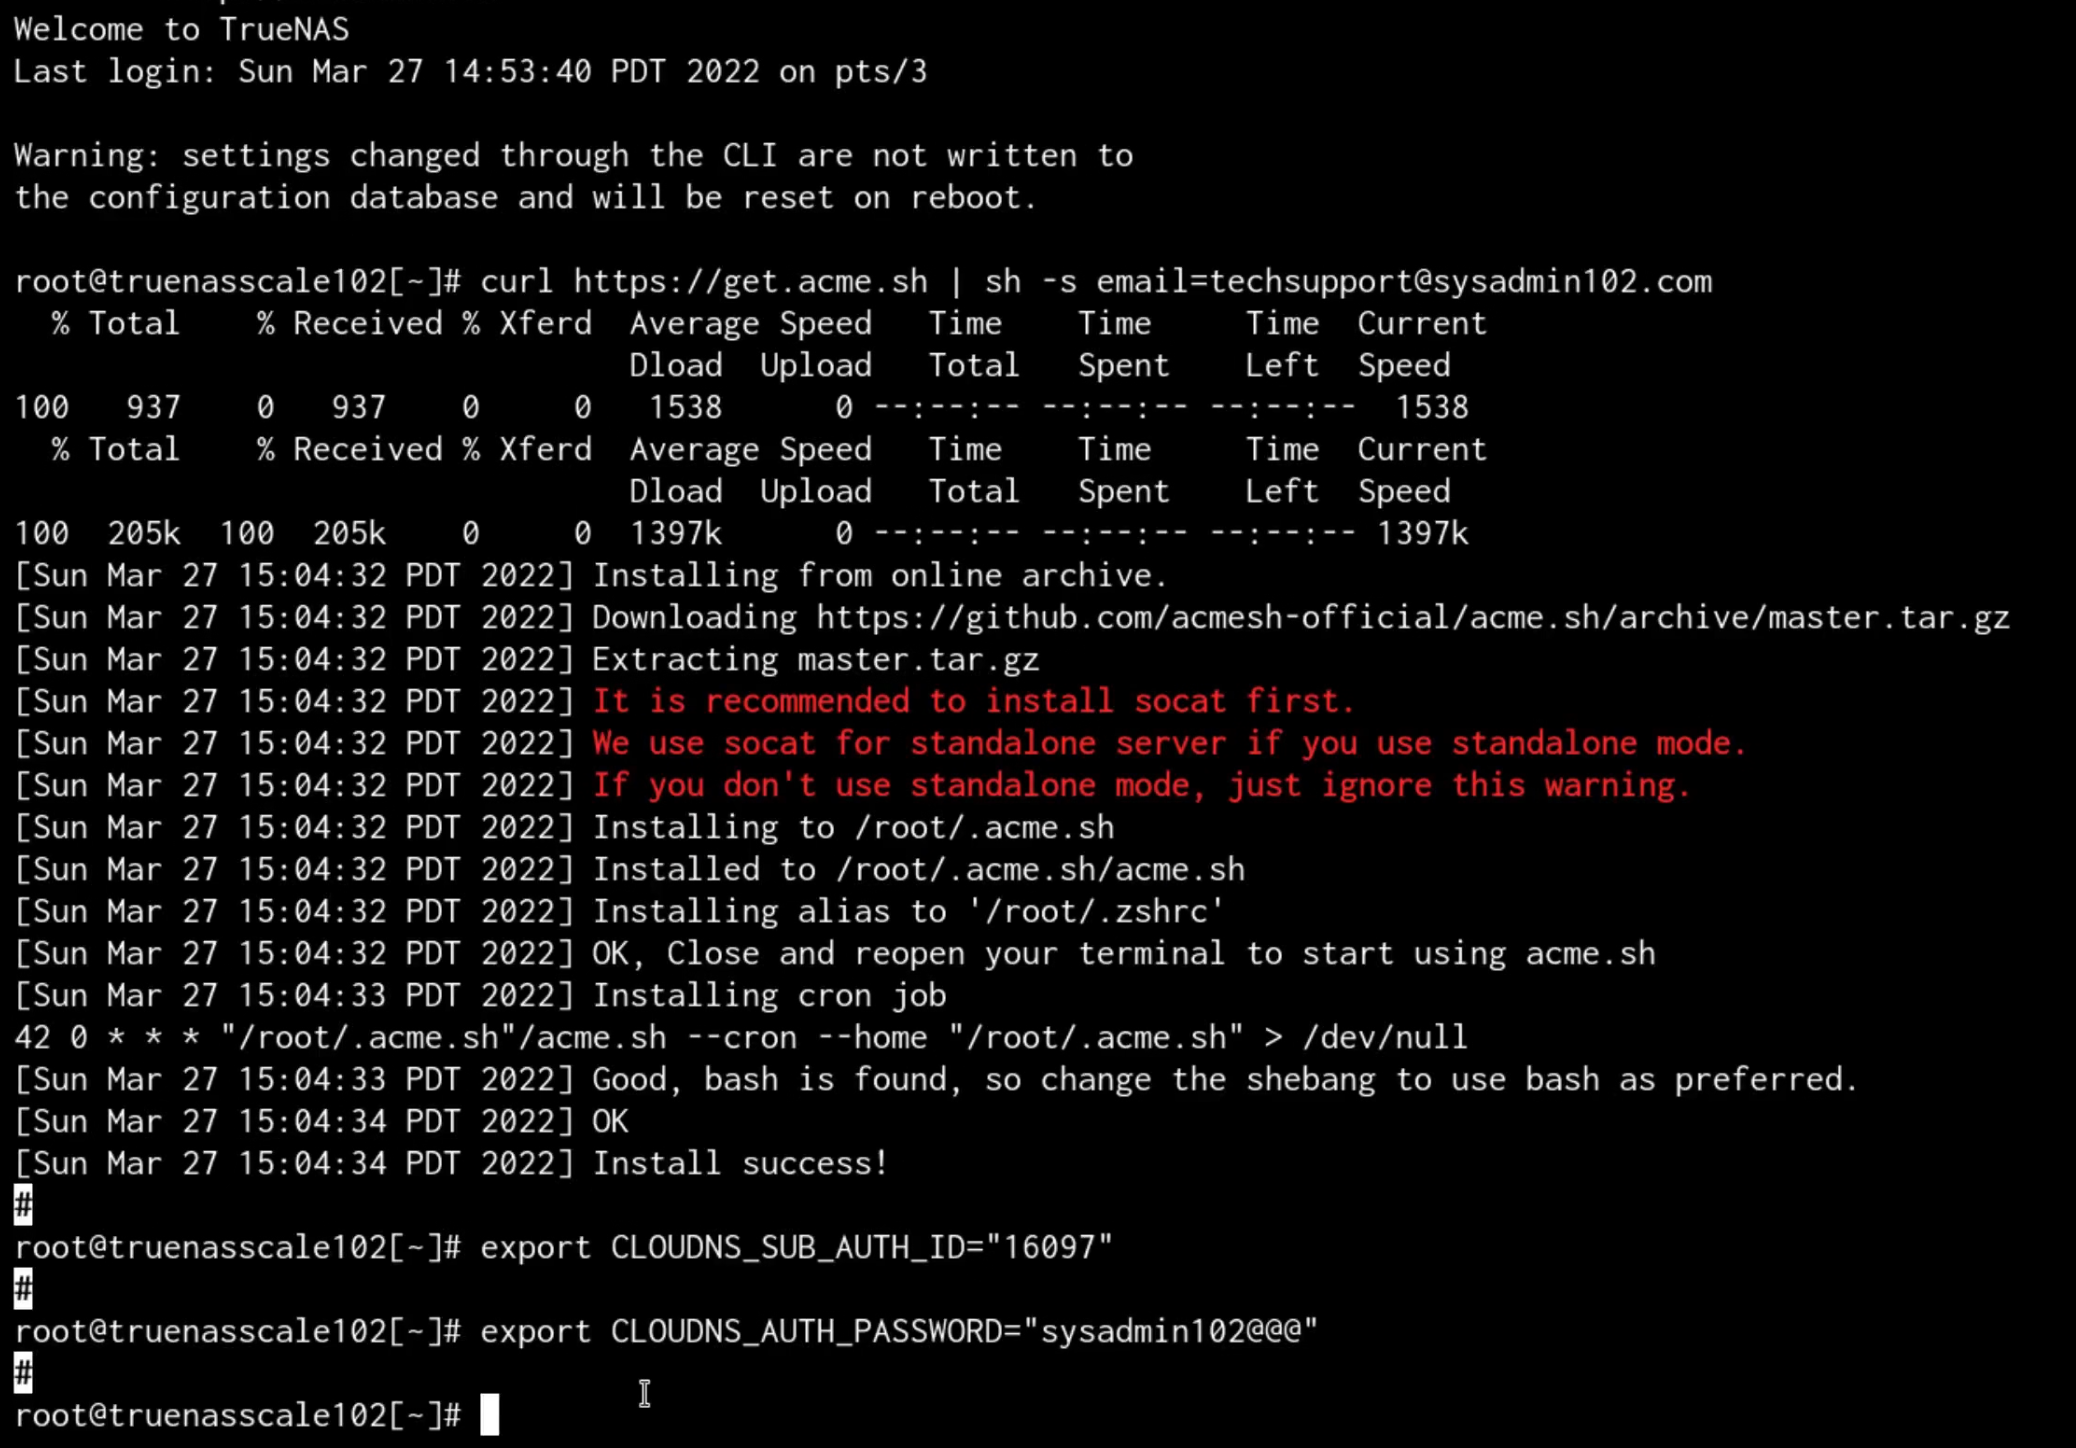
You would need to restart your system for the Hostname change and domain name change to take effect. Once your TrueNAS restarted, the next step is to install the acme.sh shell script using the below command:
curl https://get.acme.sh | sh -s email=xxxxxx@xxxxx.xxx
Use the ACME DNS API wiki to determine the correct syntax for your Domain service provider:
https://github.com/acmesh-official/acme.sh/wiki/dnsapiThe syntax below is for ClouDNS API
# Use this for a sub auth ID
export CLOUDNS_SUB_AUTH_ID="XXXXX"
# Use this for a regular auth ID
export CLOUDNS_AUTH_ID="XXXXX"
export CLOUDNS_AUTH_PASSWORD="YYYYYYYYY"
Make sure to put the credential in the quotation mark ” “
The next step is to request a certificate from Let’s Encrypt server by using the below command:
acme.sh --issue --dns dns_your --keylength 4096 -d truenasscale.sysadmin102.techReplace dns_your with your DNS API listed on the ACME Wiki. You can skipped the –keylength 4096 if you wish toy use the default setting

If everything runs smoothly, your screen should have something similar to the screenshot below:

Next, you will need to generate a API Key on TrueNAS to deploy the certificate.

After you generate the API Key, copy it, we will need it to deploy the certs on TrueNAS

You will need the Python script written by a user named danb35@TrueNAS to deploy the certificate. You will clone his certificate to your TrueNAS using the command below:
git clone https://github.com/danb35/deploy-freenasOnce you’ve downloaded the script, you’ll need to create a configuration file called deploy_config. The git repo has an example (deploy_config.example) that you can copy and modify, or you can write your own from scratch.

Open the deploy_config.example and save it as deploy_config using the nano text editor.
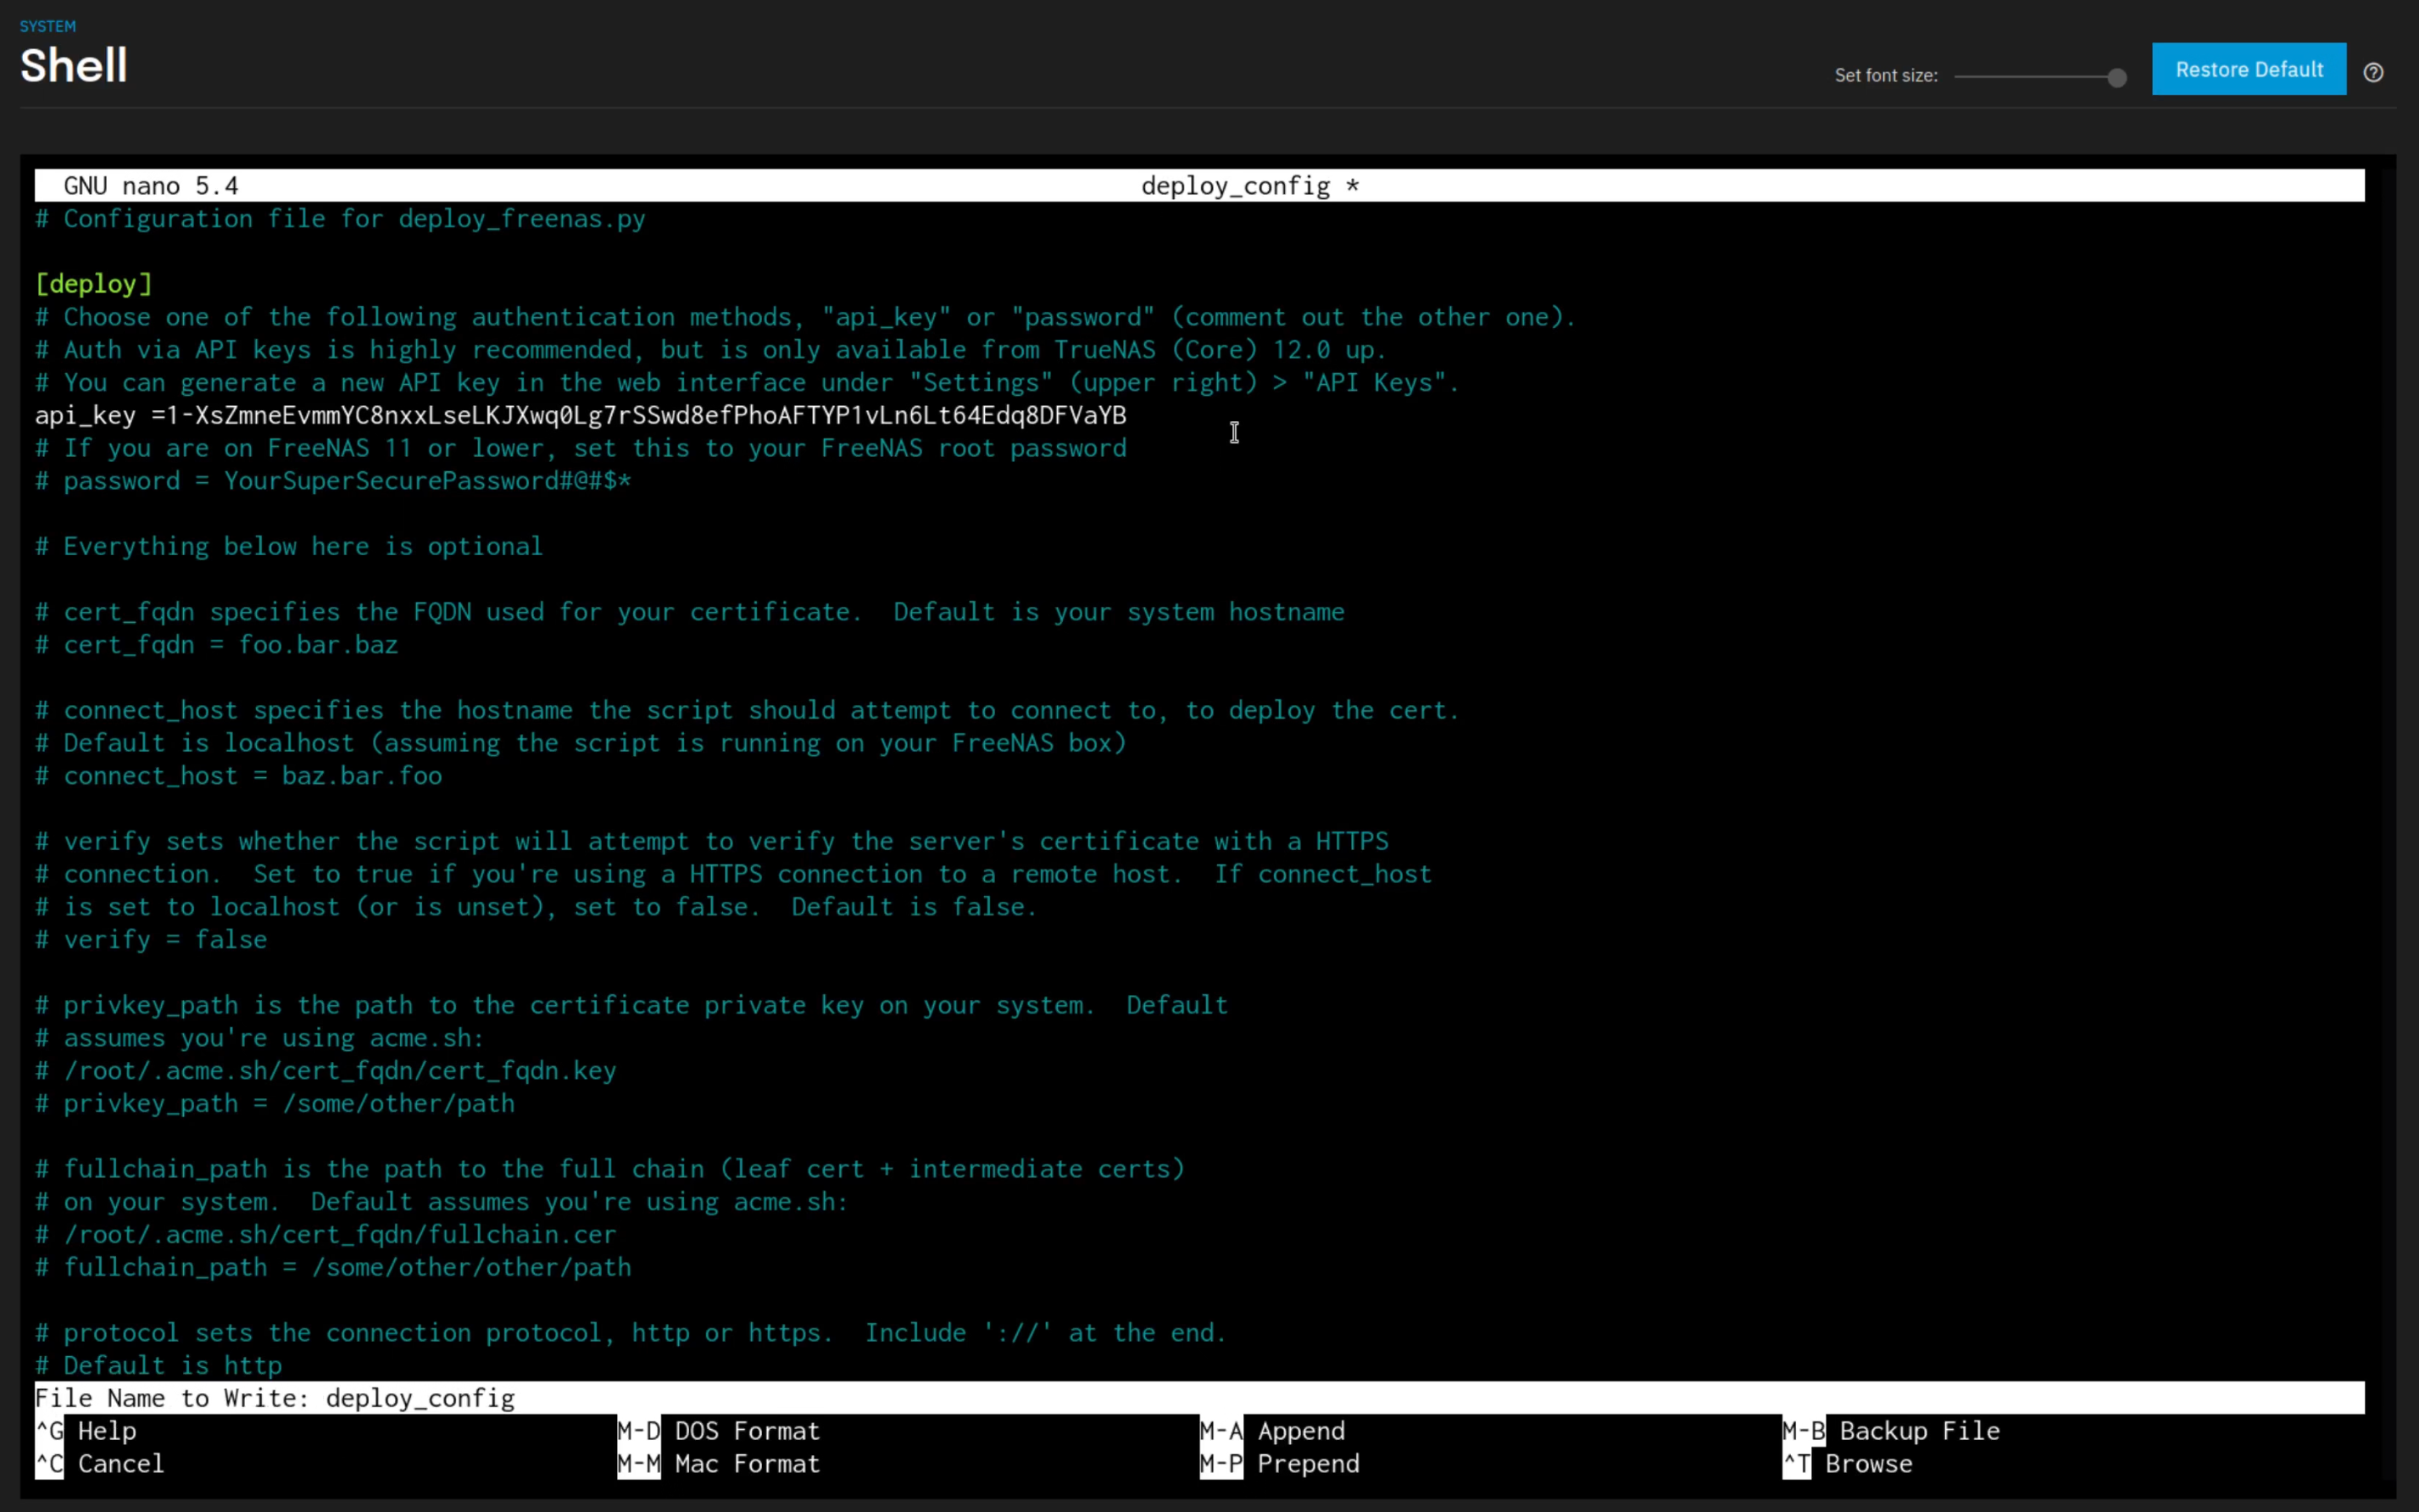
Remove the # in front of api_key and add the API key that you generated earlier
Add # in front of password = YourSuperSecurePassword#@#$* to disable the password option.

Next, you will deploy the certificate using the below command:
acme.sh --install-cert -d truenasscale102.tech --reloadcmd "~/deploy-freenas/deploy_freenas.py"Once the command is successfully run, you will get the message “Certificate import successfully.” Your Web Service will restart.
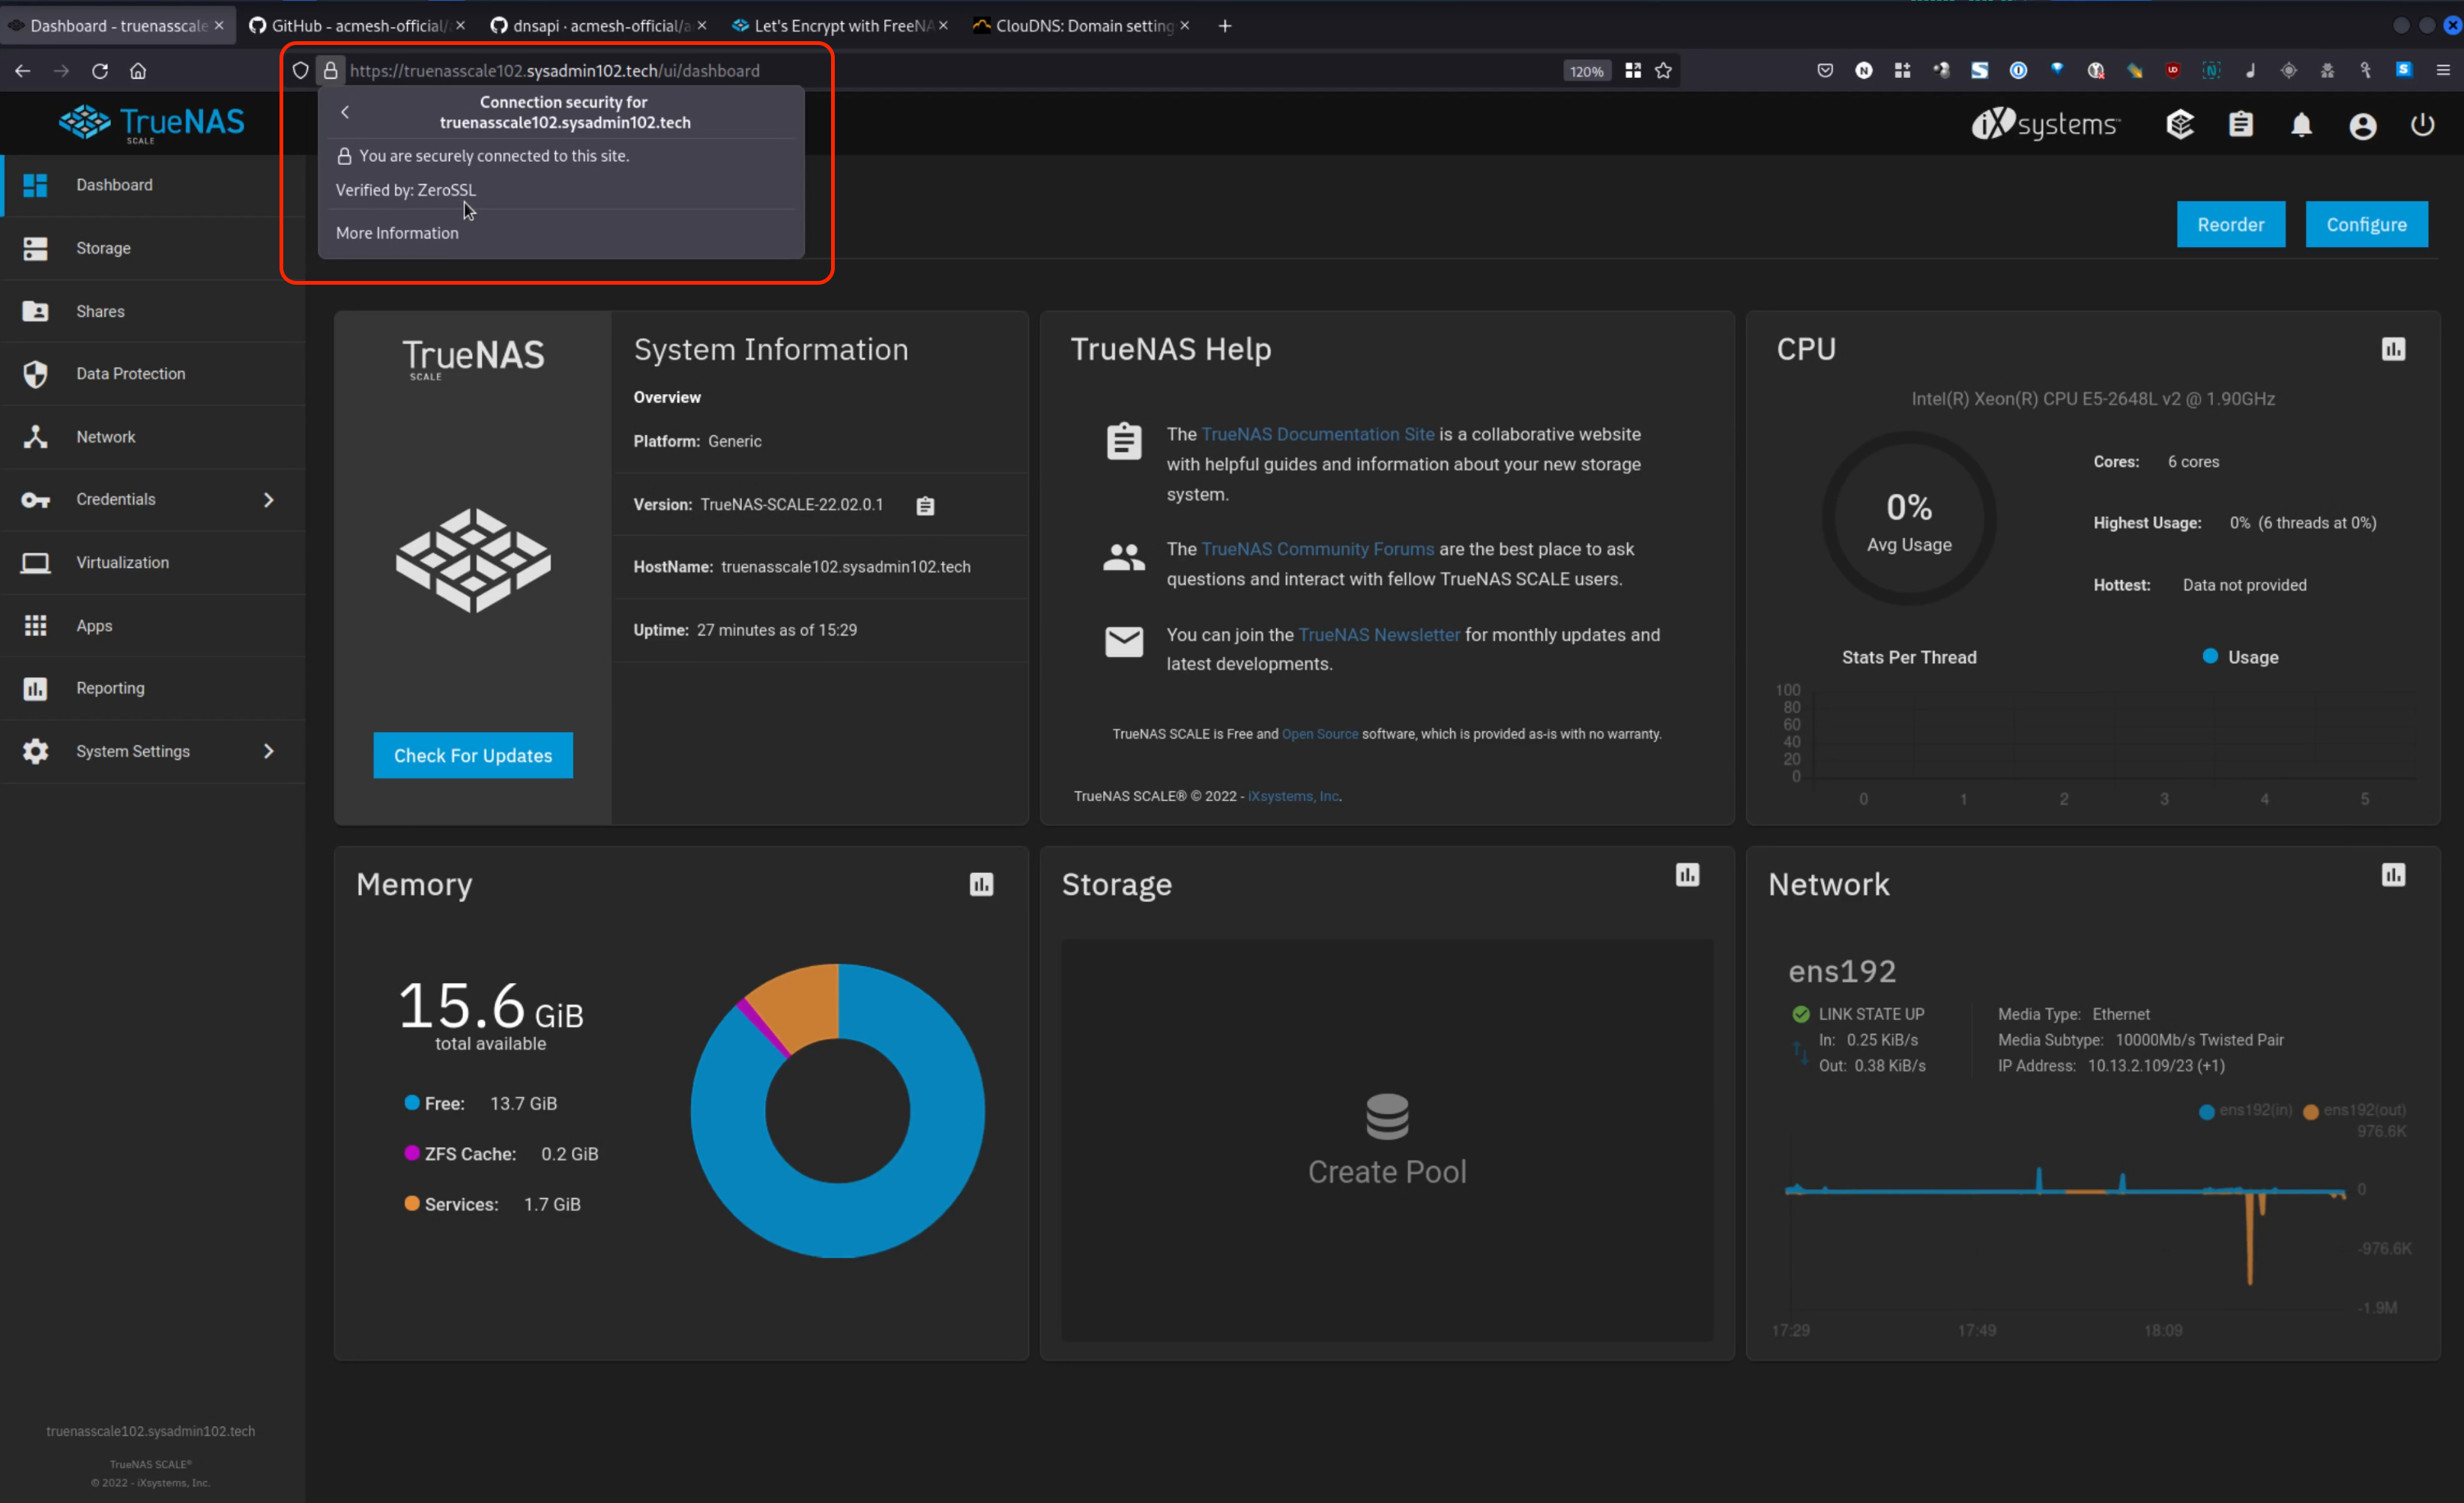
Log in after the system restarted. Then, navigate to System Settings > GUI > Settings and enable Web Interface HTTP -> HTTPS Redirect.

The system will restart Web Service, once it restarted, you will no longer see the red line over the lock icon because your certificate is signed by ZeroSSL.
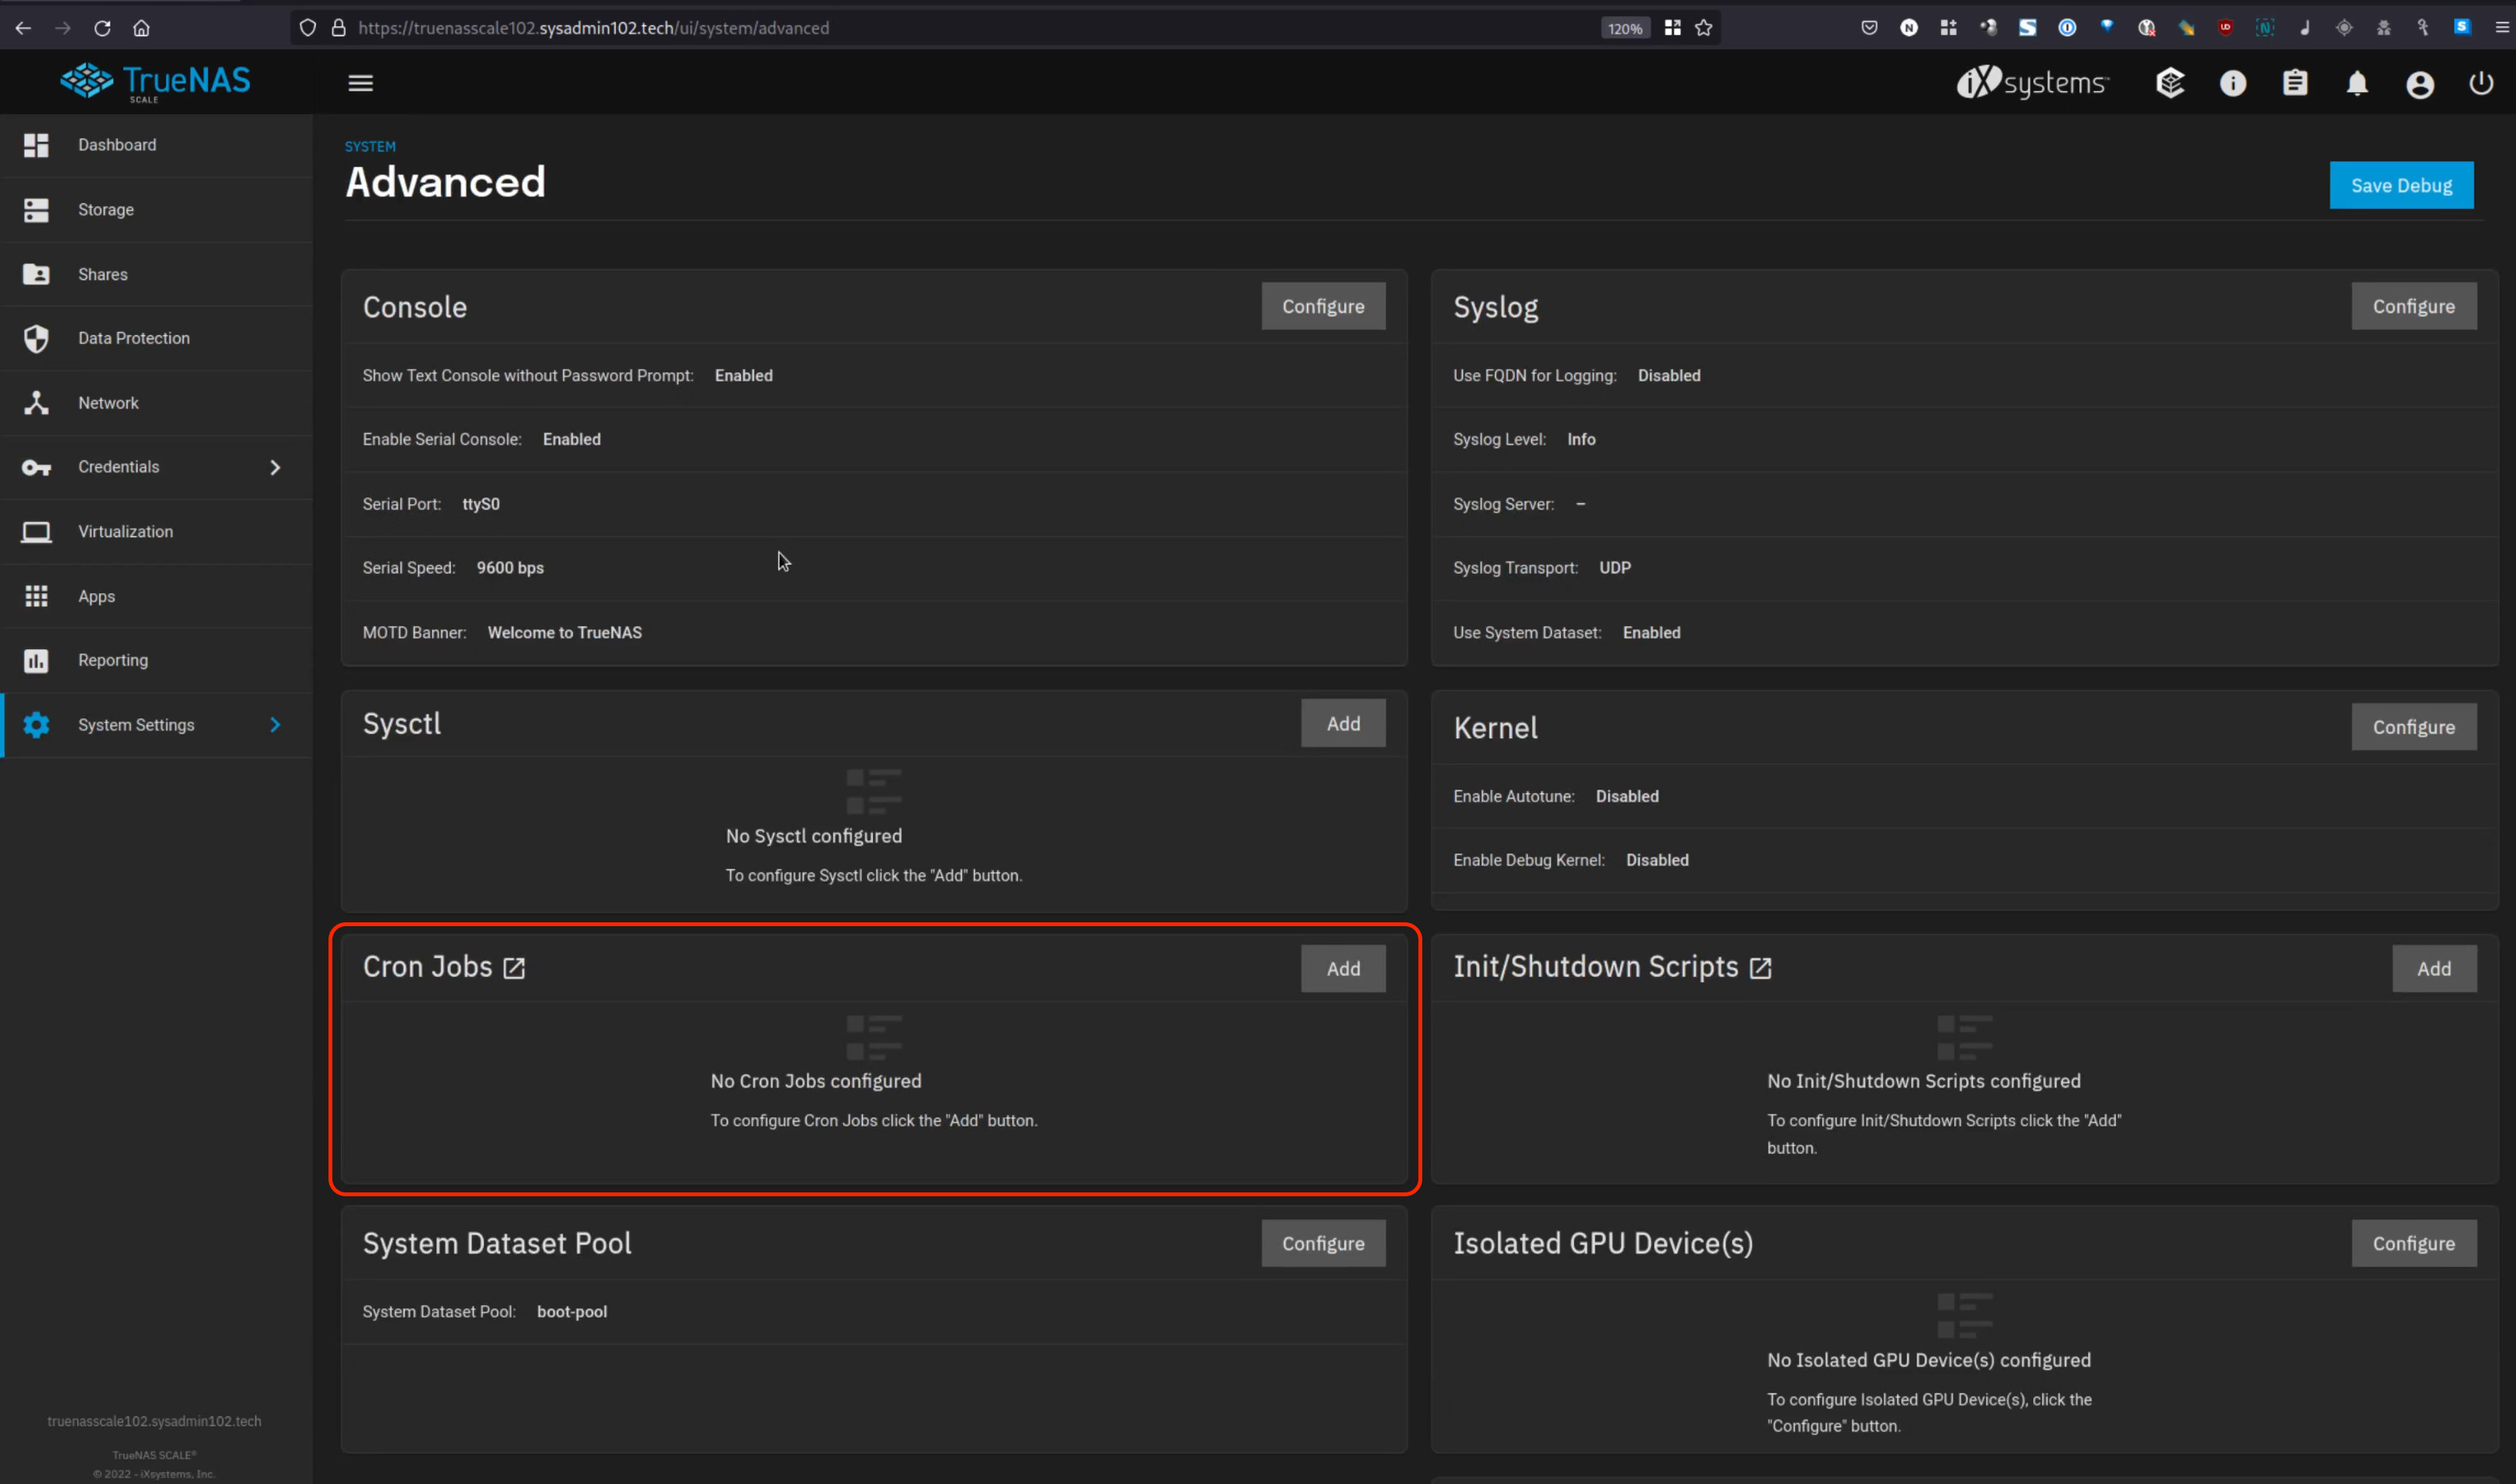
Lastly, you need to create a Cron Job to renew the certificate automatically. Navigate to the System Settings > Advanced > Add. Disregard the Warning message by selecting “Close.”
Under the description box: enter whatever describes the job. Under the command enter the below command:
/root/.acme.sh/acme.sh --cron
Congratulation, you have successfully deployed Let’s Encrypt Certificate on your TrueNAS.
Official ACME Github: https://github.com/acmesh-official/acme.sh
Official ACME DNS API Wiki: https://github.com/acmesh-official/acme.sh/wiki/dnsapi
Credit to danb35@TrueNAS. Link to the original post: https://www.truenas.com/community/resources/lets-encrypt-with-freenas-11-1-and-later.82/
Excellent tutorial ,i’m a complete noob but i have tried it .
I want to use dynamic dns duckdns.org i have set hostname truenas, domanin mydomain.duckdns.org and
i am able to generate the cert with acme.sh –insecure –issue –dns dns_duckdns -d truenas.mydomain.duckdns.org with no error
the problem arise when i use acme.sh –install-cert -d truenas.mydomain.duckdns.org –reloadcmd “~/deploy-freenas/deploy_freenas.py”
ecause i receive The domain ‘truenas.mydomain.duckdns.org’ seems to have a ECC cert already, lets use ecc cert.
Could you please help me to solve thanks.
It looks like you don’t have all 3 certificates in the folder. Perhaps, you need to run issue command again, acme.sh –issue –dns dns_duckdns –keylength 4096 -d truenas.mydomain.duckdns.org
I have solved with chmod +x deploy_freenas.py but now this is my situation :
I have find that i can issue with only one -d but not both ( -d mydomain.duckdns.org -d “*.mydomain.duckdns.org”) i have find that folder are differente from standard because it look for folder truenas (hostname ) and not for folder truenas.mydomain.duckdns.org_ecc that i obtain, but i have solved with rename and nano but now a lot of error arise:
acme.sh –install-cert -d truenas.mydomain.duckdns.org –reloadcmd “~/deploy-freenas/deploy_freenas.py”
[Sat May 27 02:32:16 CEST 2023] Run reload cmd: ~/deploy-freenas/deploy_freenas.py
Traceback (most recent call last):
File “/usr/lib/python3/dist-packages/urllib3/connection.py”, line 169, in _new_conn
conn = connection.create_connection(
File “/usr/lib/python3/dist-packages/urllib3/util/connection.py”, line 96, in create_connection
raise err
File “/usr/lib/python3/dist-packages/urllib3/util/connection.py”, line 86, in create_connection
sock.connect(sa)
ConnectionRefusedError: [Errno 111] Connection refused
During handling of the above exception, another exception occurred:
Traceback (most recent call last):
File “/usr/lib/python3/dist-packages/urllib3/connectionpool.py”, line 699, in urlopen
httplib_response = self._make_request(
File “/usr/lib/python3/dist-packages/urllib3/connectionpool.py”, line 394, in _make_request
conn.request(method, url, **httplib_request_kw)
File “/usr/lib/python3/dist-packages/urllib3/connection.py”, line 234, in request
super(HTTPConnection, self).request(method, url, body=body, headers=headers)
File “/usr/lib/python3.9/http/client.py”, line 1255, in request
self._send_request(method, url, body, headers, encode_chunked)
File “/usr/lib/python3.9/http/client.py”, line 1301, in _send_request
self.endheaders(body, encode_chunked=encode_chunked)
File “/usr/lib/python3.9/http/client.py”, line 1250, in endheaders
self._send_output(message_body, encode_chunked=encode_chunked)
File “/usr/lib/python3.9/http/client.py”, line 1010, in _send_output
self.send(msg)
File “/usr/lib/python3.9/http/client.py”, line 950, in send
self.connect()
File “/usr/lib/python3/dist-packages/urllib3/connection.py”, line 200, in connect
conn = self._new_conn()
File “/usr/lib/python3/dist-packages/urllib3/connection.py”, line 181, in _new_conn
raise NewConnectionError(
urllib3.exceptions.NewConnectionError: : Failed to establish a new connection: [Errno 111] Connection refused
During handling of the above exception, another exception occurred:
Traceback (most recent call last):
File “/usr/lib/python3/dist-packages/requests/adapters.py”, line 439, in send
resp = conn.urlopen(
File “/usr/lib/python3/dist-packages/urllib3/connectionpool.py”, line 755, in urlopen
retries = retries.increment(
File “/usr/lib/python3/dist-packages/urllib3/util/retry.py”, line 574, in increment
raise MaxRetryError(_pool, url, error or ResponseError(cause))
urllib3.exceptions.MaxRetryError: HTTPConnectionPool(host=’localhost’, port=80): Max retries exceeded with url: /api/v2.0/certificate/ (Caused by NewConnectionError(‘: Failed to establish a new connection: [Errno 111] Connection refused’))
During handling of the above exception, another exception occurred:
Traceback (most recent call last):
File “/root/deploy-freenas/deploy_freenas.py”, line 93, in
r = session.post(
File “/usr/lib/python3/dist-packages/requests/sessions.py”, line 590, in post
return self.request(‘POST’, url, data=data, json=json, **kwargs)
File “/usr/lib/python3/dist-packages/requests/sessions.py”, line 542, in request
resp = self.send(prep, **send_kwargs)
File “/usr/lib/python3/dist-packages/requests/sessions.py”, line 655, in send
r = adapter.send(request, **kwargs)
File “/usr/lib/python3/dist-packages/requests/adapters.py”, line 516, in send
raise ConnectionError(e, request=request)
requests.exceptions.ConnectionError: HTTPConnectionPool(host=’localhost’, port=80): Max retries exceeded with url: /api/v2.0/certificate/ (Caused by NewConnectionError(‘: Failed to establish a new connection: [Errno 111] Connection refused’))
[Sat May 27 02:32:16 CEST 2023] Reload error for :
cd .acme.sh
nano account.conf
Add this to the file (replace with your token):
DuckDNS_Token=”yourToken”
DEPLOY_TRUENAS_APIKEY=”YourTrueNASAPIKey>”
DEPLOY_TRUENAS_HOSTNAME=”truenas.yourdomain.duckdns.org”
The issue is with DuckDNS not allowing multiple TXT record the same time, but here is the work around:
Issue cert:
acme.sh –insecure –issue –dns dns_duckdns -d mydomain.duckdns.org
Once you get the root domain cert, then request wild card cert:
acme.sh –insecure –issue –dns dns_duckdns -d mydomain.duckdns.org -d ‘*.mydomain.duckdns.org’
You can use deploy hook instead if you are having issues with the python script (only run this if you were able to obtain the cert):
acme.sh –insecure –deploy -d “mydomain.duckdns.org” –deploy-hook truenas
Let me know if it works
i am able to obtain the cert with acme.sh –insecure –issue –dns dns_duckdns -d mydomain.duckdns.org but when i
try acme.sh –insecure –issue –dns dns_duckdns -d mydomain.duckdns.org -d ‘*.mydomain.duckdns.org’ it loop with 10 second delay endless
root@truenas[~]# acme.sh –insecure –issue –dns dns_duckdns -d mydomain.duckdns.org -d “*.mydomain.duckdns.org”
[Tue May 30 09:38:03 CEST 2023] Domains have changed.
[Tue May 30 09:38:03 CEST 2023] Using CA: https://acme.zerossl.com/v2/DV90
[Tue May 30 09:38:03 CEST 2023] Multi domain=’DNS:mydomain.duckdns.org,DNS:*.mydomain.duckdns.org’
[Tue May 30 09:38:03 CEST 2023] Getting domain auth token for each domain
[Tue May 30 09:38:06 CEST 2023] Getting webroot for domain=’mydomain.duckdns.org’
[Tue May 30 09:38:06 CEST 2023] Getting webroot for domain=’*.mydomain.duckdns.org’
[Tue May 30 09:38:06 CEST 2023] Adding txt value: xxxx-xxxx for domain: _acme-challenge.mydomain.duckdns.org
[Tue May 30 09:38:06 CEST 2023] Trying to add TXT record
[Tue May 30 09:38:07 CEST 2023] TXT record has been successfully added to your DuckDNS domain.
[Tue May 30 09:38:07 CEST 2023] Note that all subdomains under this domain uses the same TXT record.
[Tue May 30 09:38:07 CEST 2023] The txt record is added: Success.
[Tue May 30 09:38:07 CEST 2023] Adding txt value: xxxxx for domain: _acme-challenge.mydomain.duckdns.org
[Tue May 30 09:38:07 CEST 2023] Trying to add TXT record
[Tue May 30 09:38:07 CEST 2023] TXT record has been successfully added to your DuckDNS domain.
[Tue May 30 09:38:07 CEST 2023] Note that all subdomains under this domain uses the same TXT record.
[Tue May 30 09:38:07 CEST 2023] The txt record is added: Success.
[Tue May 30 09:38:07 CEST 2023] Let’s check each DNS record now. Sleep 20 seconds first.
[Tue May 30 09:38:28 CEST 2023] You can use ‘–dnssleep’ to disable public dns checks.
[Tue May 30 09:38:28 CEST 2023] See: https://github.com/acmesh-official/acme.sh/wiki/dnscheck
[Tue May 30 09:38:28 CEST 2023] Checking mydomain.duckdns.org for _acme-challenge.mydomain.duckdns.org
[Tue May 30 09:38:29 CEST 2023] Not valid yet, let’s wait 10 seconds and check next one.
[Tue May 30 09:38:40 CEST 2023] Checking mydomain.duckdns.org for _acme-challenge.mydomain.duckdns.org
[Tue May 30 09:38:40 CEST 2023] Domain mydomain.duckdns.org ‘_acme-challenge.mydomain.duckdns.org’ success.
[Tue May 30 09:38:40 CEST 2023] Let’s wait 10 seconds and check again.
[Tue May 30 09:38:51 CEST 2023] You can use ‘–dnssleep’ to disable public dns checks.
[Tue May 30 09:38:51 CEST 2023] See: https://github.com/acmesh-official/acme.sh/wiki/dnscheck
[Tue May 30 09:38:51 CEST 2023] Checking mydomain.duckdns.org for _acme-challenge.mydomain.duckdns.org
[Tue May 30 09:38:52 CEST 2023] Not valid yet, let’s wait 10 seconds and check next one.
[Tue May 30 09:39:03 CEST 2023] Checking mydomain.duckdns.org for _acme-challenge.mydomain.duckdns.org
[Tue May 30 09:39:03 CEST 2023] Already success, continue next one.
[Tue May 30 09:39:03 CEST 2023] Let’s wait 10 seconds and check again.
[Tue May 30 09:39:14 CEST 2023] You can use ‘–dnssleep’ to disable public dns checks.
[Tue May 30 09:39:14 CEST 2023] See: https://github.com/acmesh-official/acme.sh/wiki/dnscheck
[Tue May 30 09:39:15 CEST 2023] Checking mydomain.duckdns.org for _acme-challenge.mydomain.duckdns.org
[Tue May 30 09:39:15 CEST 2023] Not valid yet, let’s wait 10 seconds and check next one.
Since you reacted to your domain, I’m not sure what your domain looks like, but if your domain is domain.duckdns.org. then it’s a subdomain of duckdns. You don’t owe duckdns.org, so Wildcard won’t work in this situation. Use your subdomain instead.