
In this post, I’ll show you how to create a Let’s Encrypt wildcard certificate on OPNsense with ACME Client.
➡️If you think this tutorial is helpful, please support my channel by subscribing to my YouTube channel or by using the Amazon/eBay/ClouDNS Affiliated links below (Full Disclaimer). I will get a small commission from your purchase to grow my channel:
🚀 ClouDNS Affiliated: https://www.cloudns.net/aff/id/255803/
🚀 Things I used for my server: https://amzn.to/3hudohP
🚀 Tools I used: https://amzn.to/3uXaSUr
🚀 Devices I used: https://amzn.to/3FYlfxk
🚀 Networking/Cybersecurity/Programming Books: https://amzn.to/3HEYwb0
🚀 TrueNAS HBA SAS controller IT Mode from the Art of Server: https://ebay.us/cBWEvJ
🧧 PayPal Donation: https://www.paypal.com/paypalme/sysadmin102
If you don’t like reading posts like I do, you can follow along on my Youtube Channel. Below is the video:
OPNsense makes it super simple for creating and deploying the Let’s Encrypt certificate on your network. Before we get started with the step-by-step, I want to define what Let’s Encrypt is and what an ACME client is.
Let’s Encrypt: A free, automated, and open certificate authority, run for the public’s benefit. It is a service provided by the Internet Security Research Group (ISRG). Read more about the ACME protocol in their documentation.
An ACME client is any software that can talk to an ACME (Automatic Certificate Management Environment) enabled Certificate Authority (such as Let’s Encrypt, BuyPass Go, ZeroSSL, etc). Some are tools designed to be used by end-users to order and manage certificates, some are integrations into other services (such as a built-in feature in a web hosting product).
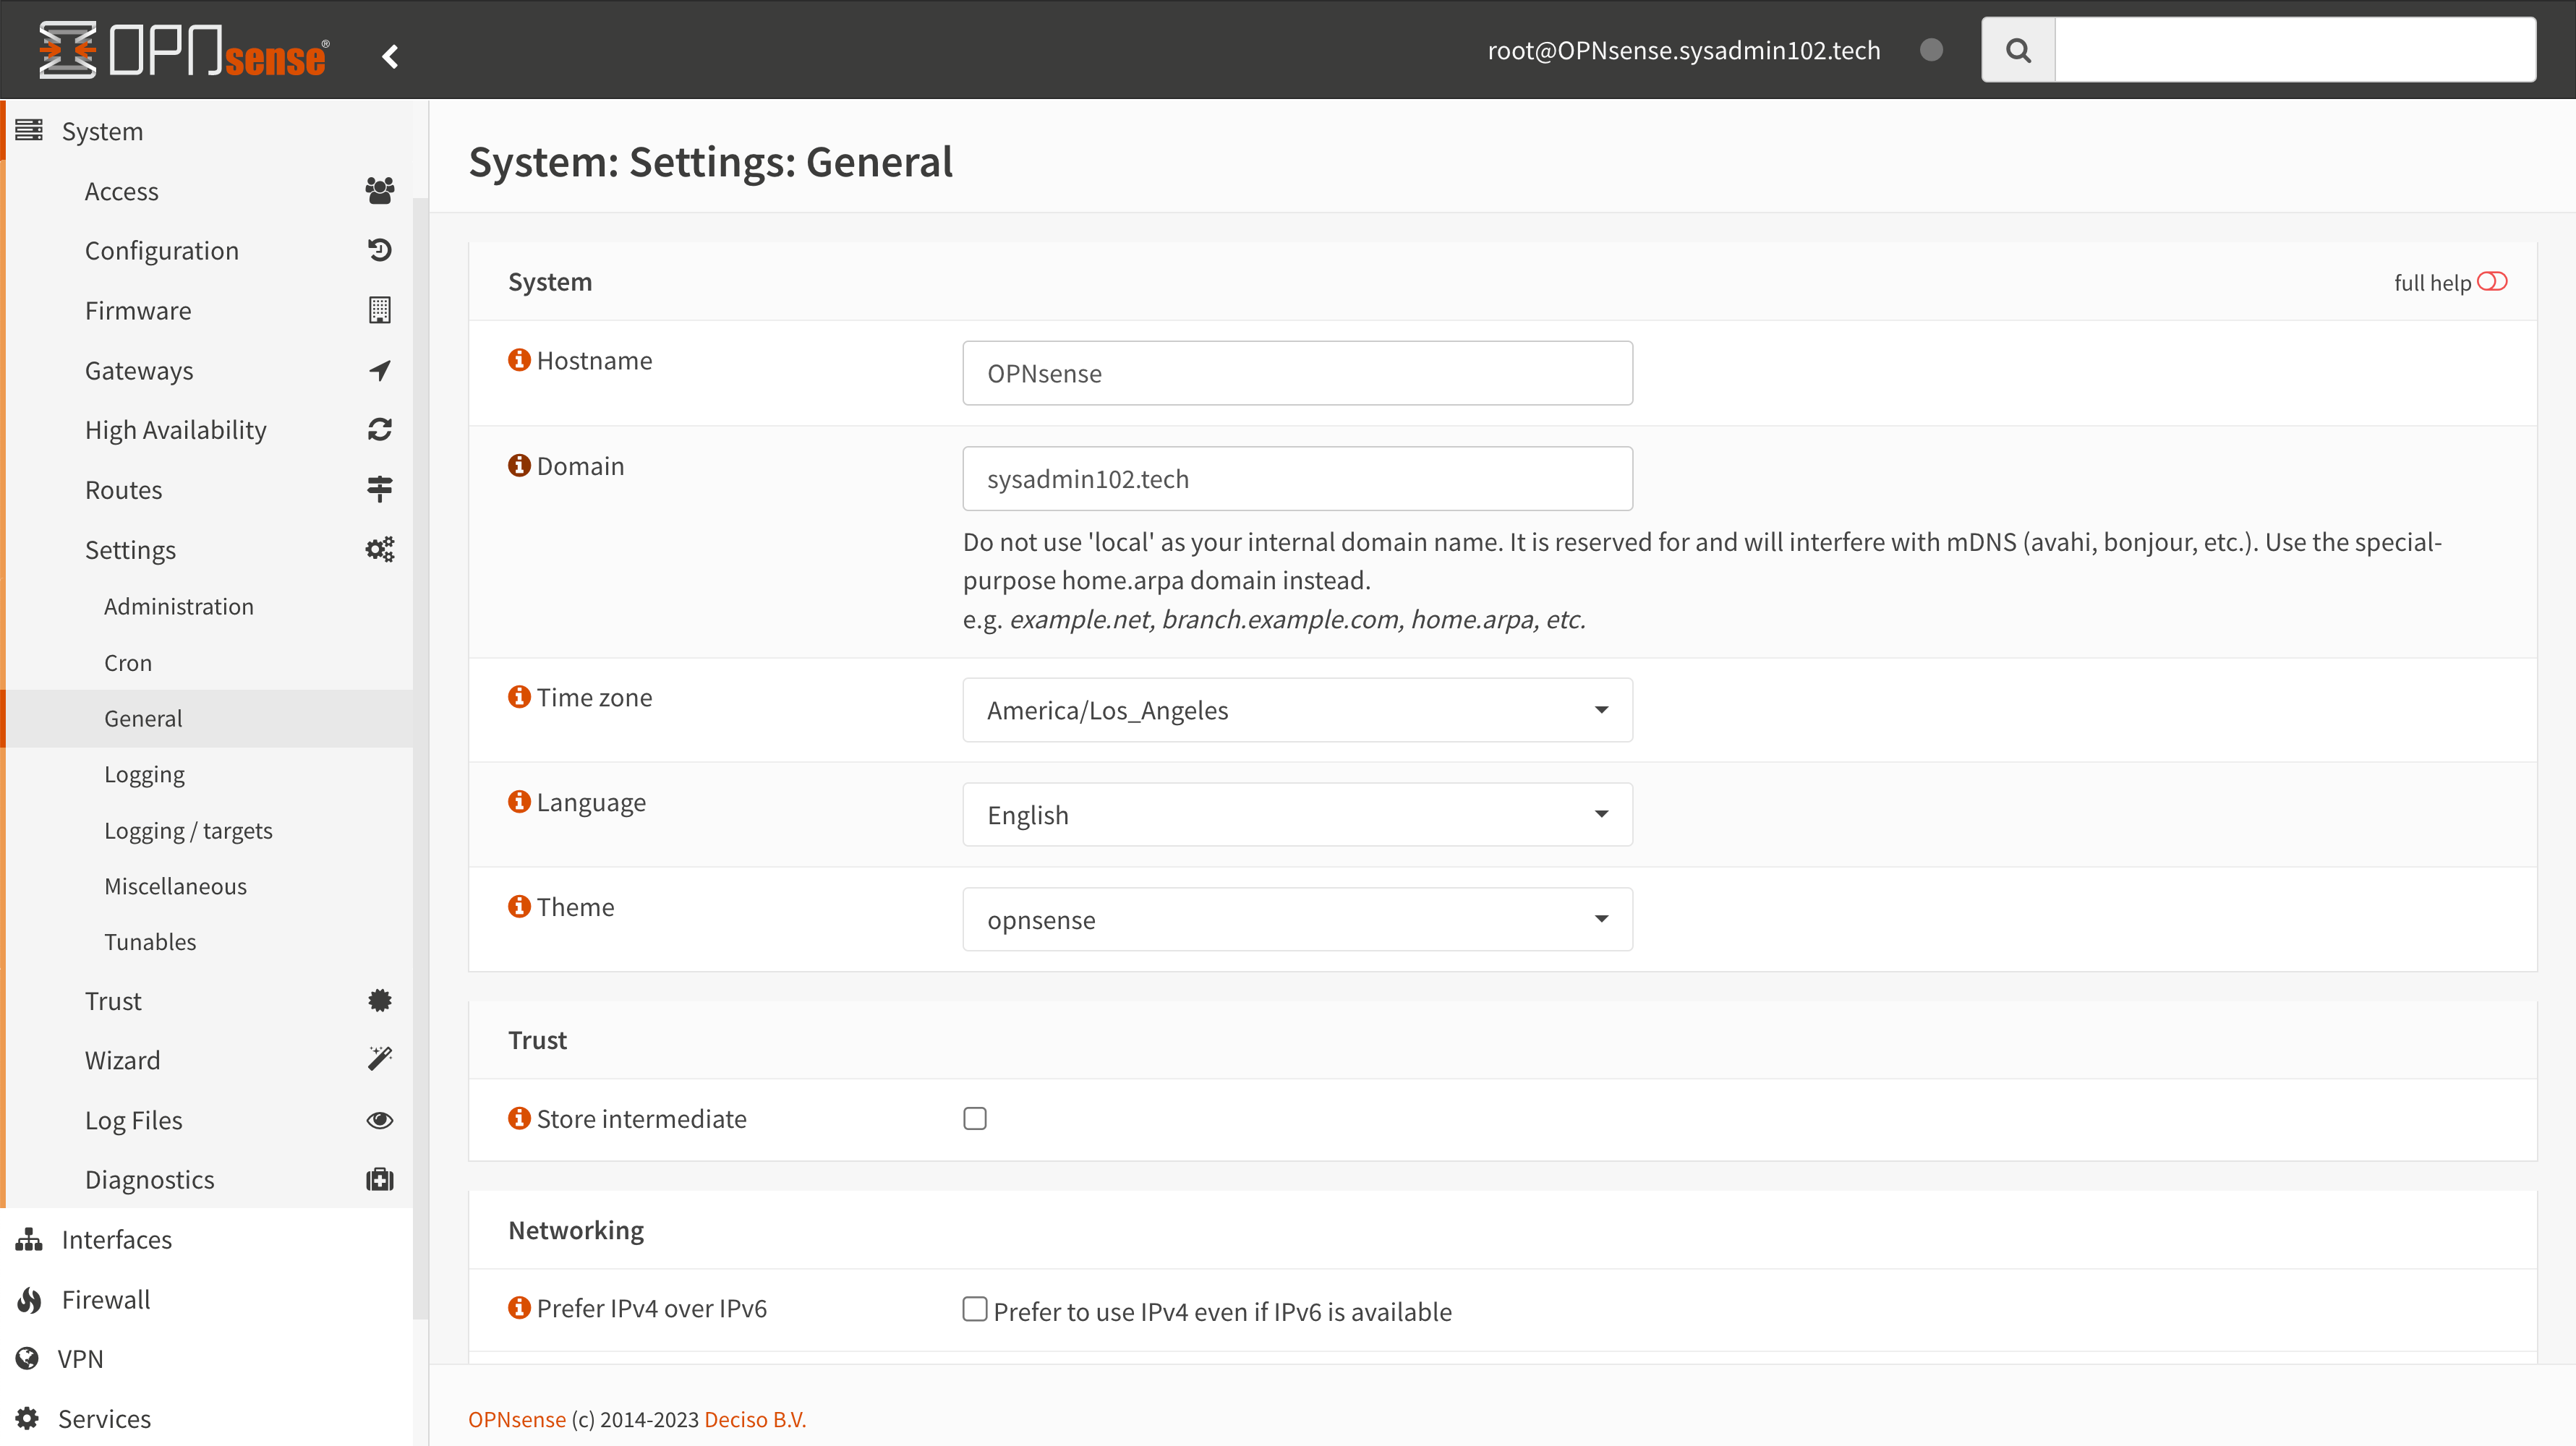
The first step would be to change your domain name to your “registered domain name” instead of the default “local”. You will need to navigate to System > Settings > General to change your domain name as shown in the screenshot below.
Next, you will need to install the ACME Client plugin by navigating to System > Firmware > Plugins. Select the plus icon to install ACME Client.

Then, you will open the ACME Client Setting under Services > ACME Client > Settings. I love the fact that the OPNsense development team or ACME plugin maintainer actually took their time and included the Quick Start Guide with links to all the resources that you needed in other to use ACME Client.

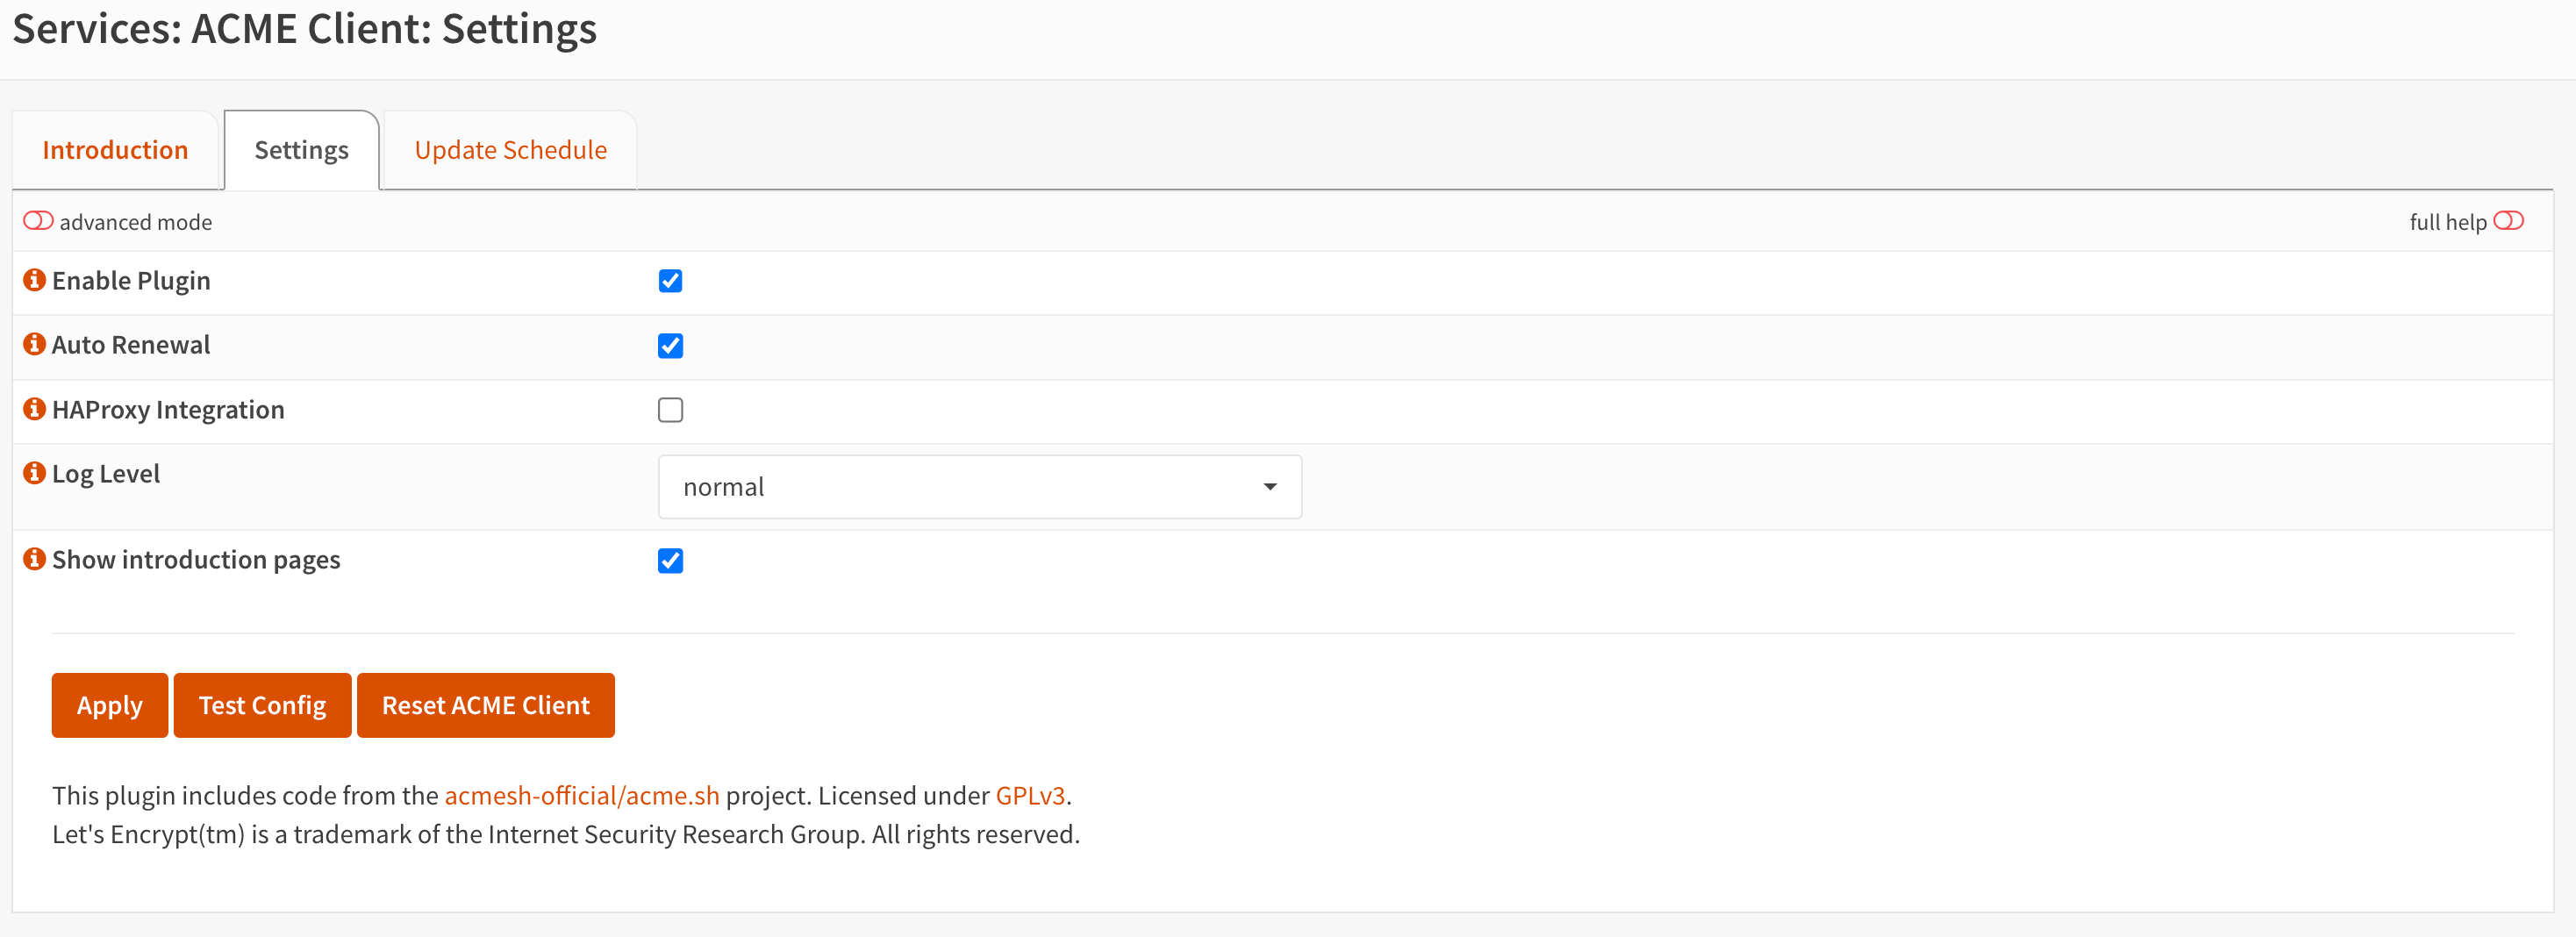
Next step, you will select Settings. Then check Enable Plugin, Auto-Renewal, and select Apply to enable ACME Plugin. The auto-renewal will run the ACMEscript to check for the certificate expiration date. LetsEncrypt only allows renewal of certificates that are within 30 days of expiration. ACME client will renew the certificate when it’s within 30 days of expiration.
Then, you will need to register an account with your chosen Certificate Authority (Let’s Encrypt in this case). Navigate to Services > ACME Client > Accounts and select Accounts. Select the plus icon to add a new account. You can name it with your domain name or whichever name you desire. The email address will be associated with this account. You will get notifications if your certificate is about to expire and the automatic renewal fails to renew the certificate.

It’s best to test your configuration on the Let’s Encrypt Test CA first since there is a Failed Validation limit of 5 failures per account, per hostname, and per hour if you are using the production Let’s Encrypt CA. Read more about rate limits. We will use Let’s Encrypt Test CA until we can be sure that we have configured the ACME client correctly.

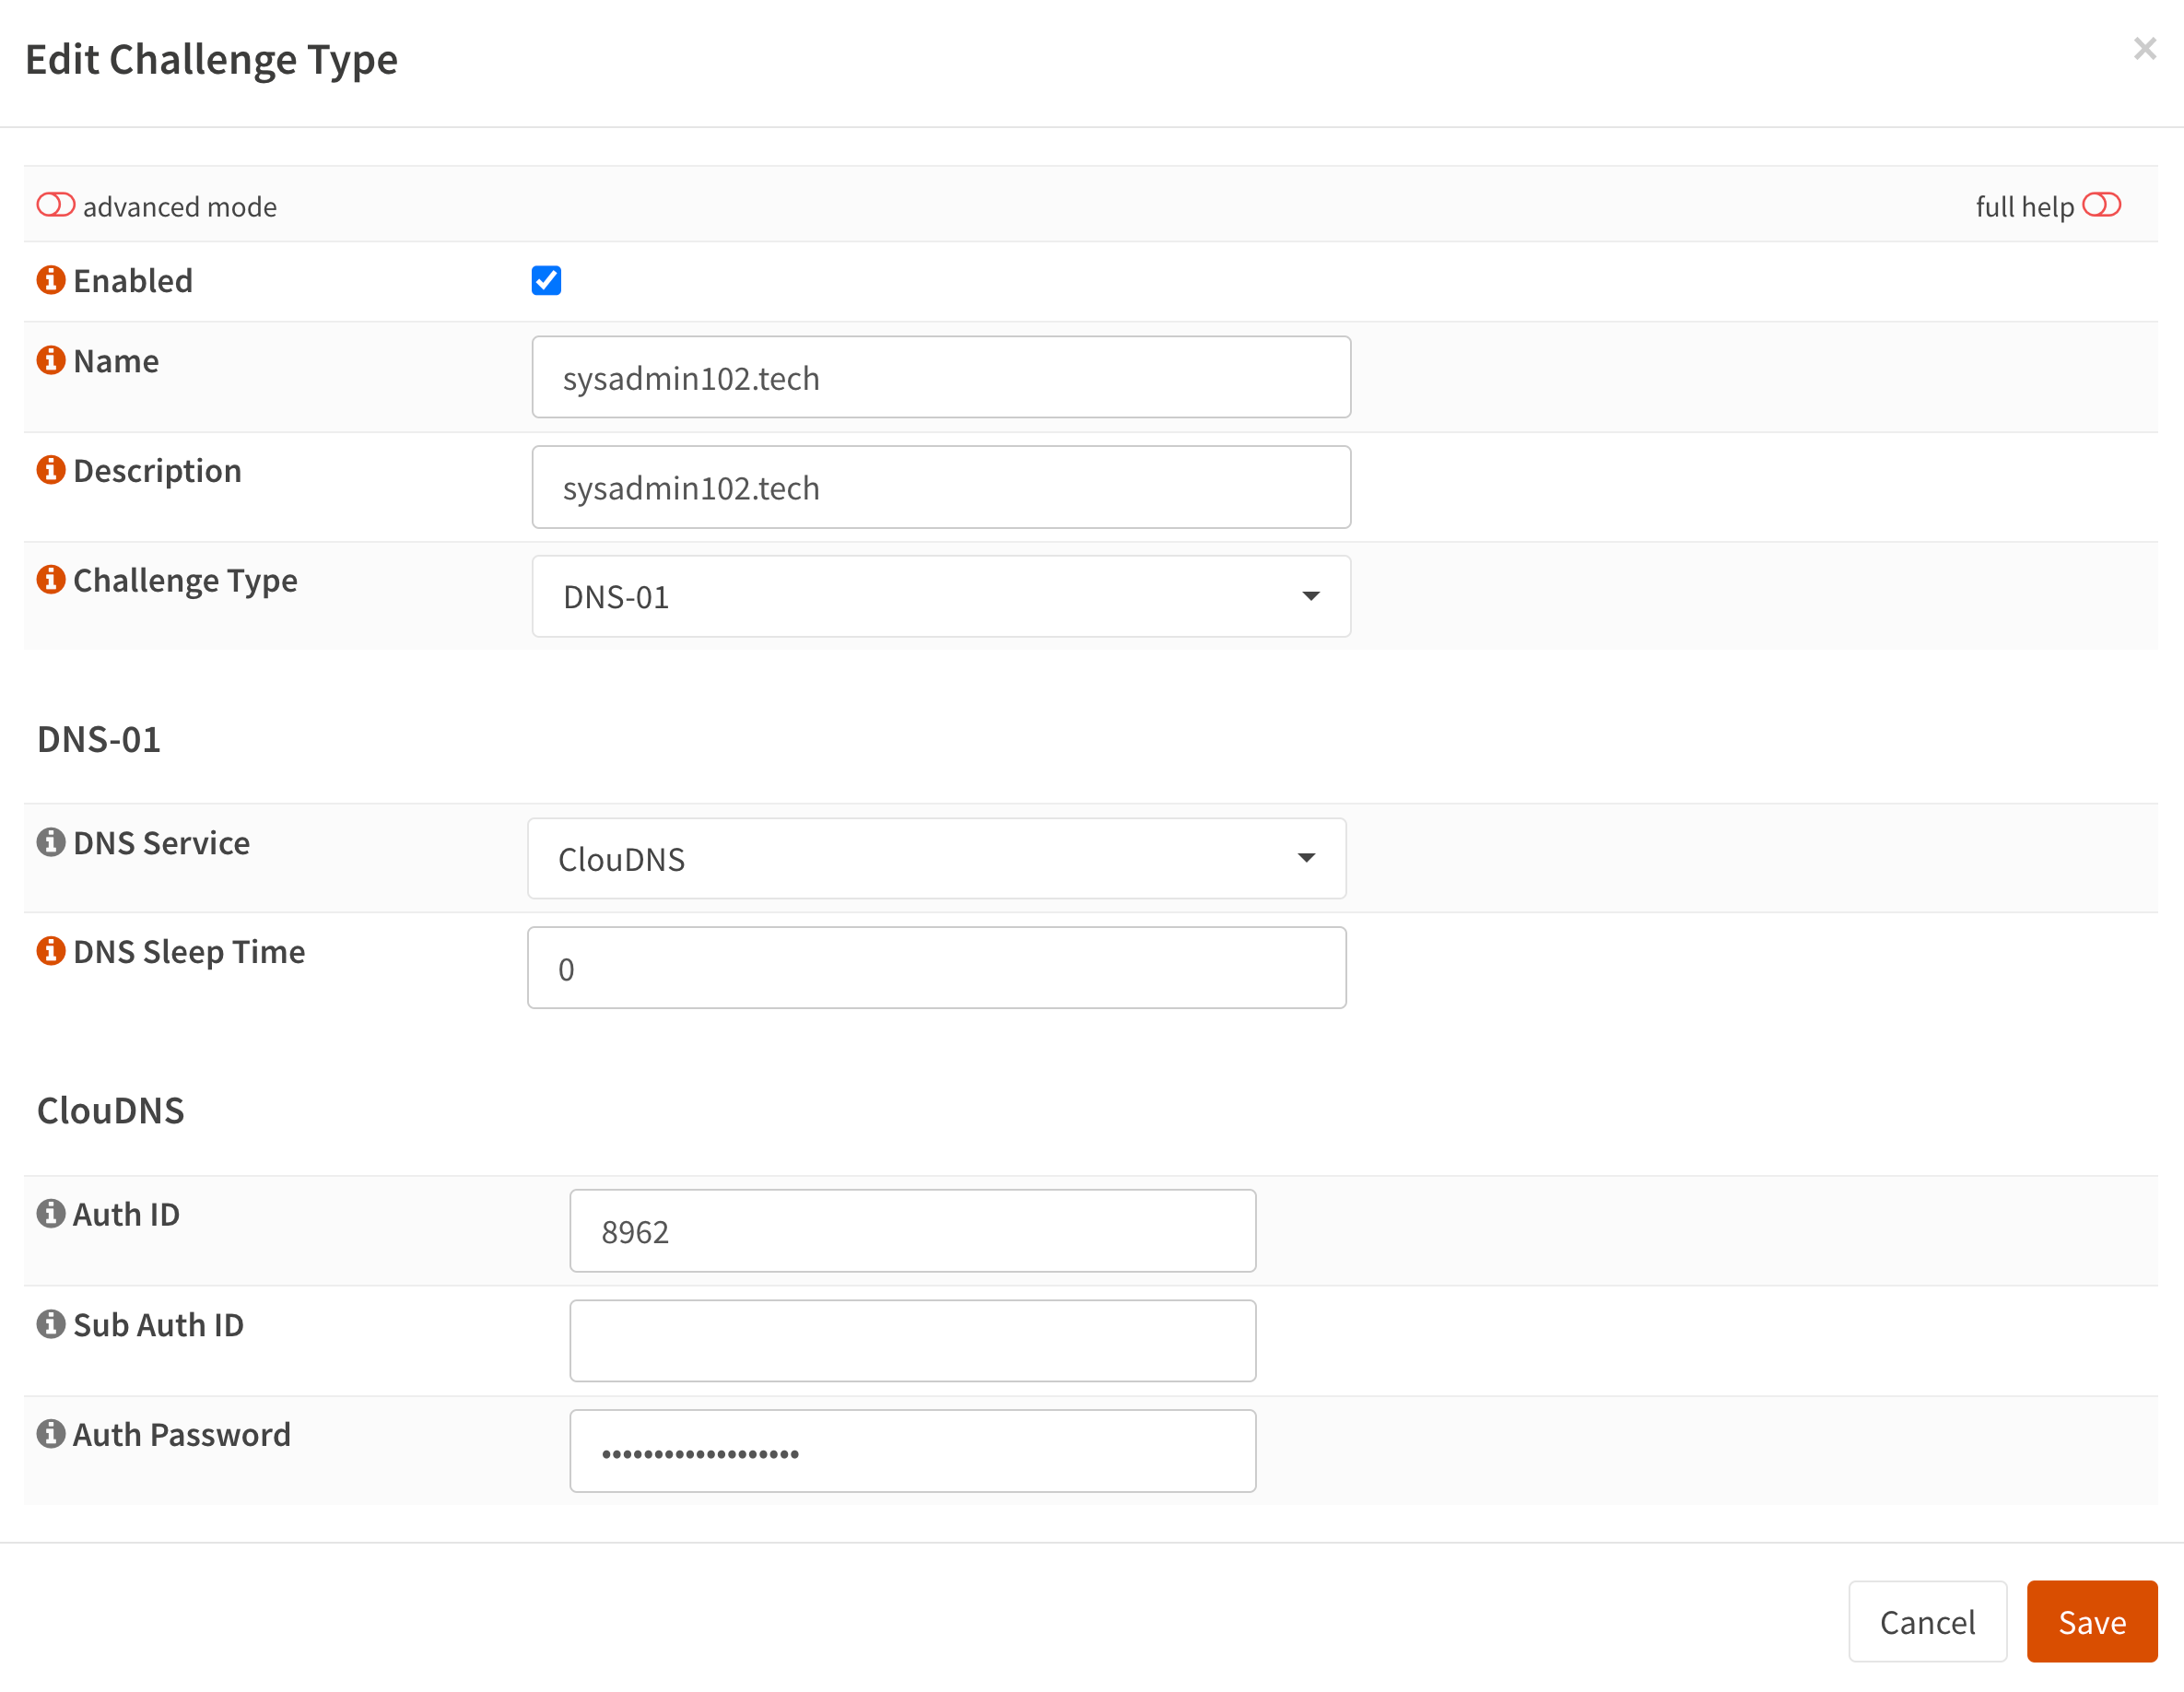
Next, you will navigate to Services > ACME Client > Challenge Types. Select Challenge Types and select the plus icon to add a new challenge type. From here, you will name your challenge type. I used my domain name for both fields, Name, and Description.
As defined by the ACME standard, Certificate Authorities (CAs) must validate that you control a domain name. This is done by using “challenges”. The following challenge types are supported:
- DNS-01: This is the most reliable challenge type and thus highly recommended when using this plugin. It requires that you control the DNS for your domain name and that your DNS provider is supported both by acme.sh and this plugin.
- HTTP-01: This challenge type usually requires manual configuration and is not recommended. The DNS name used in the certificate must point to the OPNsense host where the ACME Client plugin is running on. The integrated web service will try to guess the correct settings for your setup, but this may not always work out-of-the-box. Furthermore this challenge type cannot be used to validate wildcard certificates with Let’s Encrypt.
- TLS-ALPN-01: This works similar to the HTTP-01 challenge type and has the same requirements. It works if port 80 is unavailable. Other challenge types should be preferred. This challenge type cannot be used to validate wildcard certificates with Let’s Encrypt.
We will use DNS-01 since it is the most reliable challenge type. You will need to select your DNS service and input your login credential. Credential is provided by your DNS Service provider such as CloudDNS, or Cloudflare.
Next, you will need to set up Automation by navigating to Services > ACME Client > Automations > Select Automations.
Automations are a completely optional feature, but they can make life much easier, especially when using short-lived certificates. Typically use-cases include:
- Restart a service when a certificate was renewed to ensure that the newest certificate is being used. This is especially useful when using an ACME certificate for the OPNsense WebGUI or in combination with the HAProxy or NGINX plugins. Any OPNsense core service or plugin service may be restarted.
- Copy a certificate to one or more other hosts using the SFTP/SSH protocol. This way OPNsense can be used as a central authority for ACME certificates and secrets for DNS providers can be kept on a secure device.
- Deploy a certificate to an external service, for example a CDN provider.
This plugin can theoretically utilize most of acme.sh’s webhooks. However, not all webhooks are currently implemented. Feel free to submit a feature request if support for a acme.sh webhook should be added to the plugin.
Input a Name for your Automation. The description is optional. Then, select the command you wish to run from the list. In this case, we select Restart OPNsense Web UI. Then select Save to create the a new automation.

Next, you will need to add a new certificate by navigating to Services > ACME Client > Certificates > Select Certificates.
The following principles apply when managing certificates with this plugin:
- Certificates must be validated by the CA before they can be used. This process runs in the background and may take several minutes to complete. The progress can be monitored by using the log files.
- Certificates are stored in the OPNsense certificate storage. When a CA has completed the validation of a certificate request, the resulting certificate is then automatically imported into the OPNsense certificate storage. The same applies when renewing certificates, the existing entry in the OPNsense certificate storage will automatically be updated.
- When removing a certificate from the plugin, the certificate in the OPNsense certificate storage is NOT removed, because it may still be used by a core application or another plugin. Obsolete certificates should be manually removed from the OPNsense certificate storage. Note that when creating a new certificate with the same name, a new certificated will be imported into the OPNsense certificate storage (instead of updating the existing entry).
When experiencing issues, try setting the log level to “debug” on the settings page.
Command Name: your domain name
Description: anything or you can repeat your domain name again
Atl Names: *.domainname (this is your wildcard certificate)
ACME Account: select the one you created in the previous step
Challenge Type: select the one you created in the previous step
Key Length: Select the key length value (default is 4096 bit)
Automations: Reload Web UI
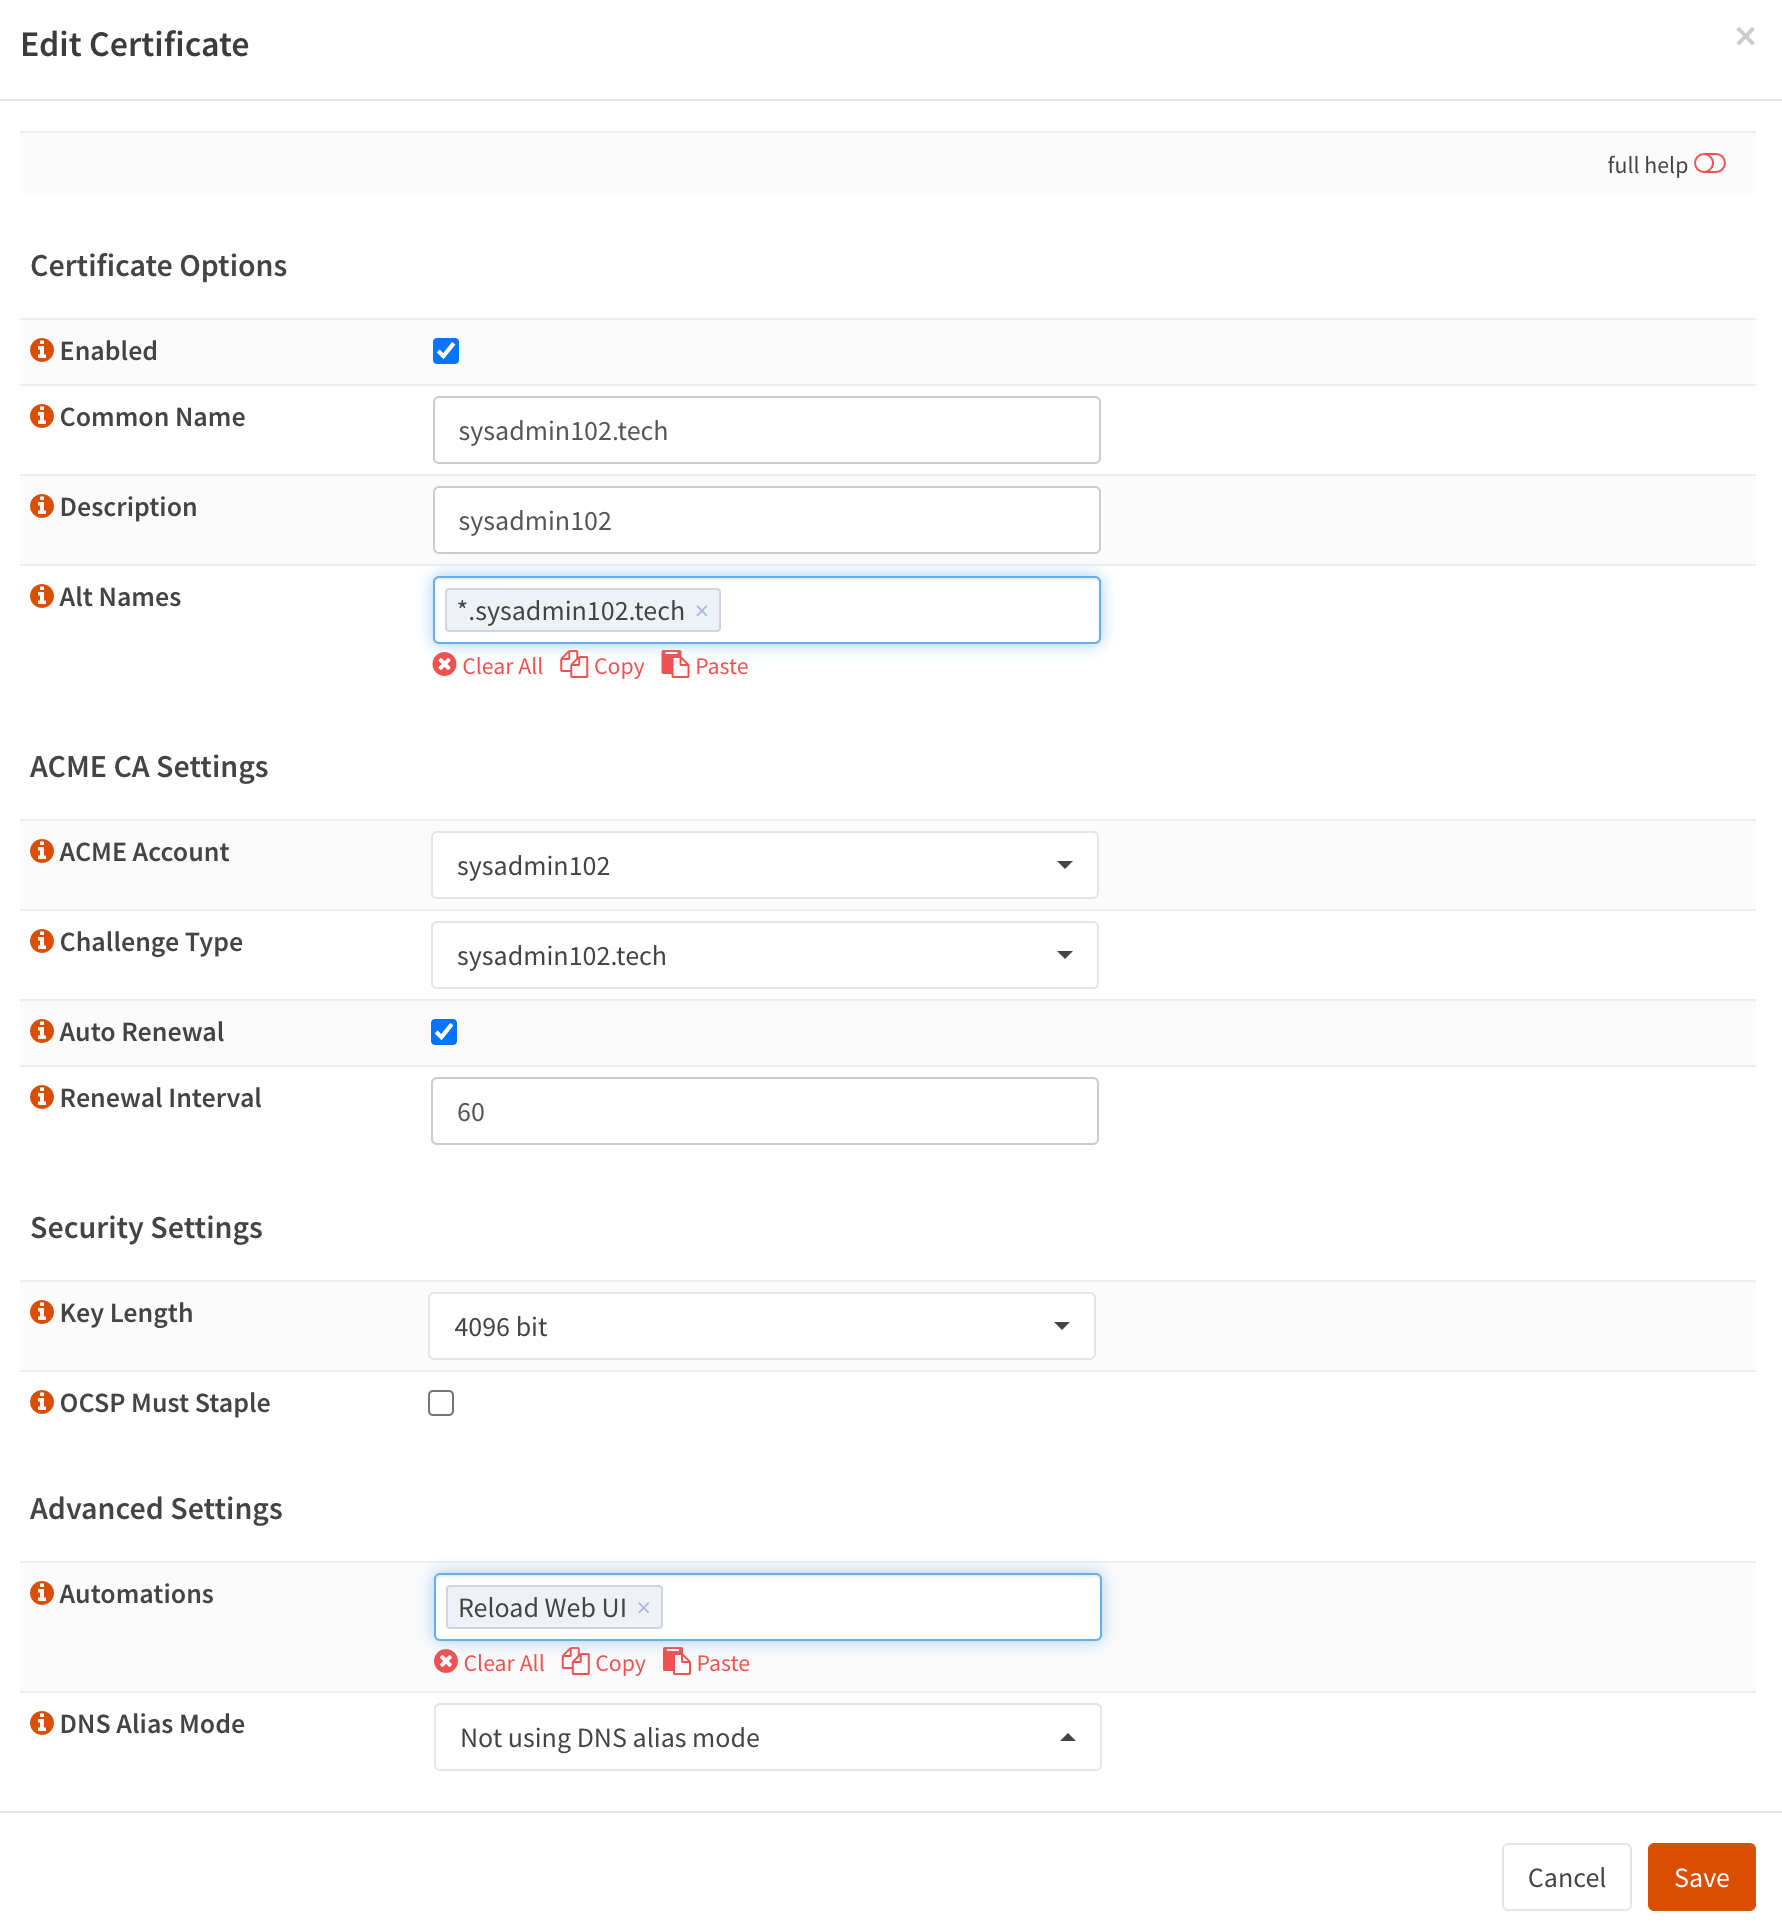
Then select Issue/Renew All Certificates or the third icon under Commands to Issue/Renew a single certificate.

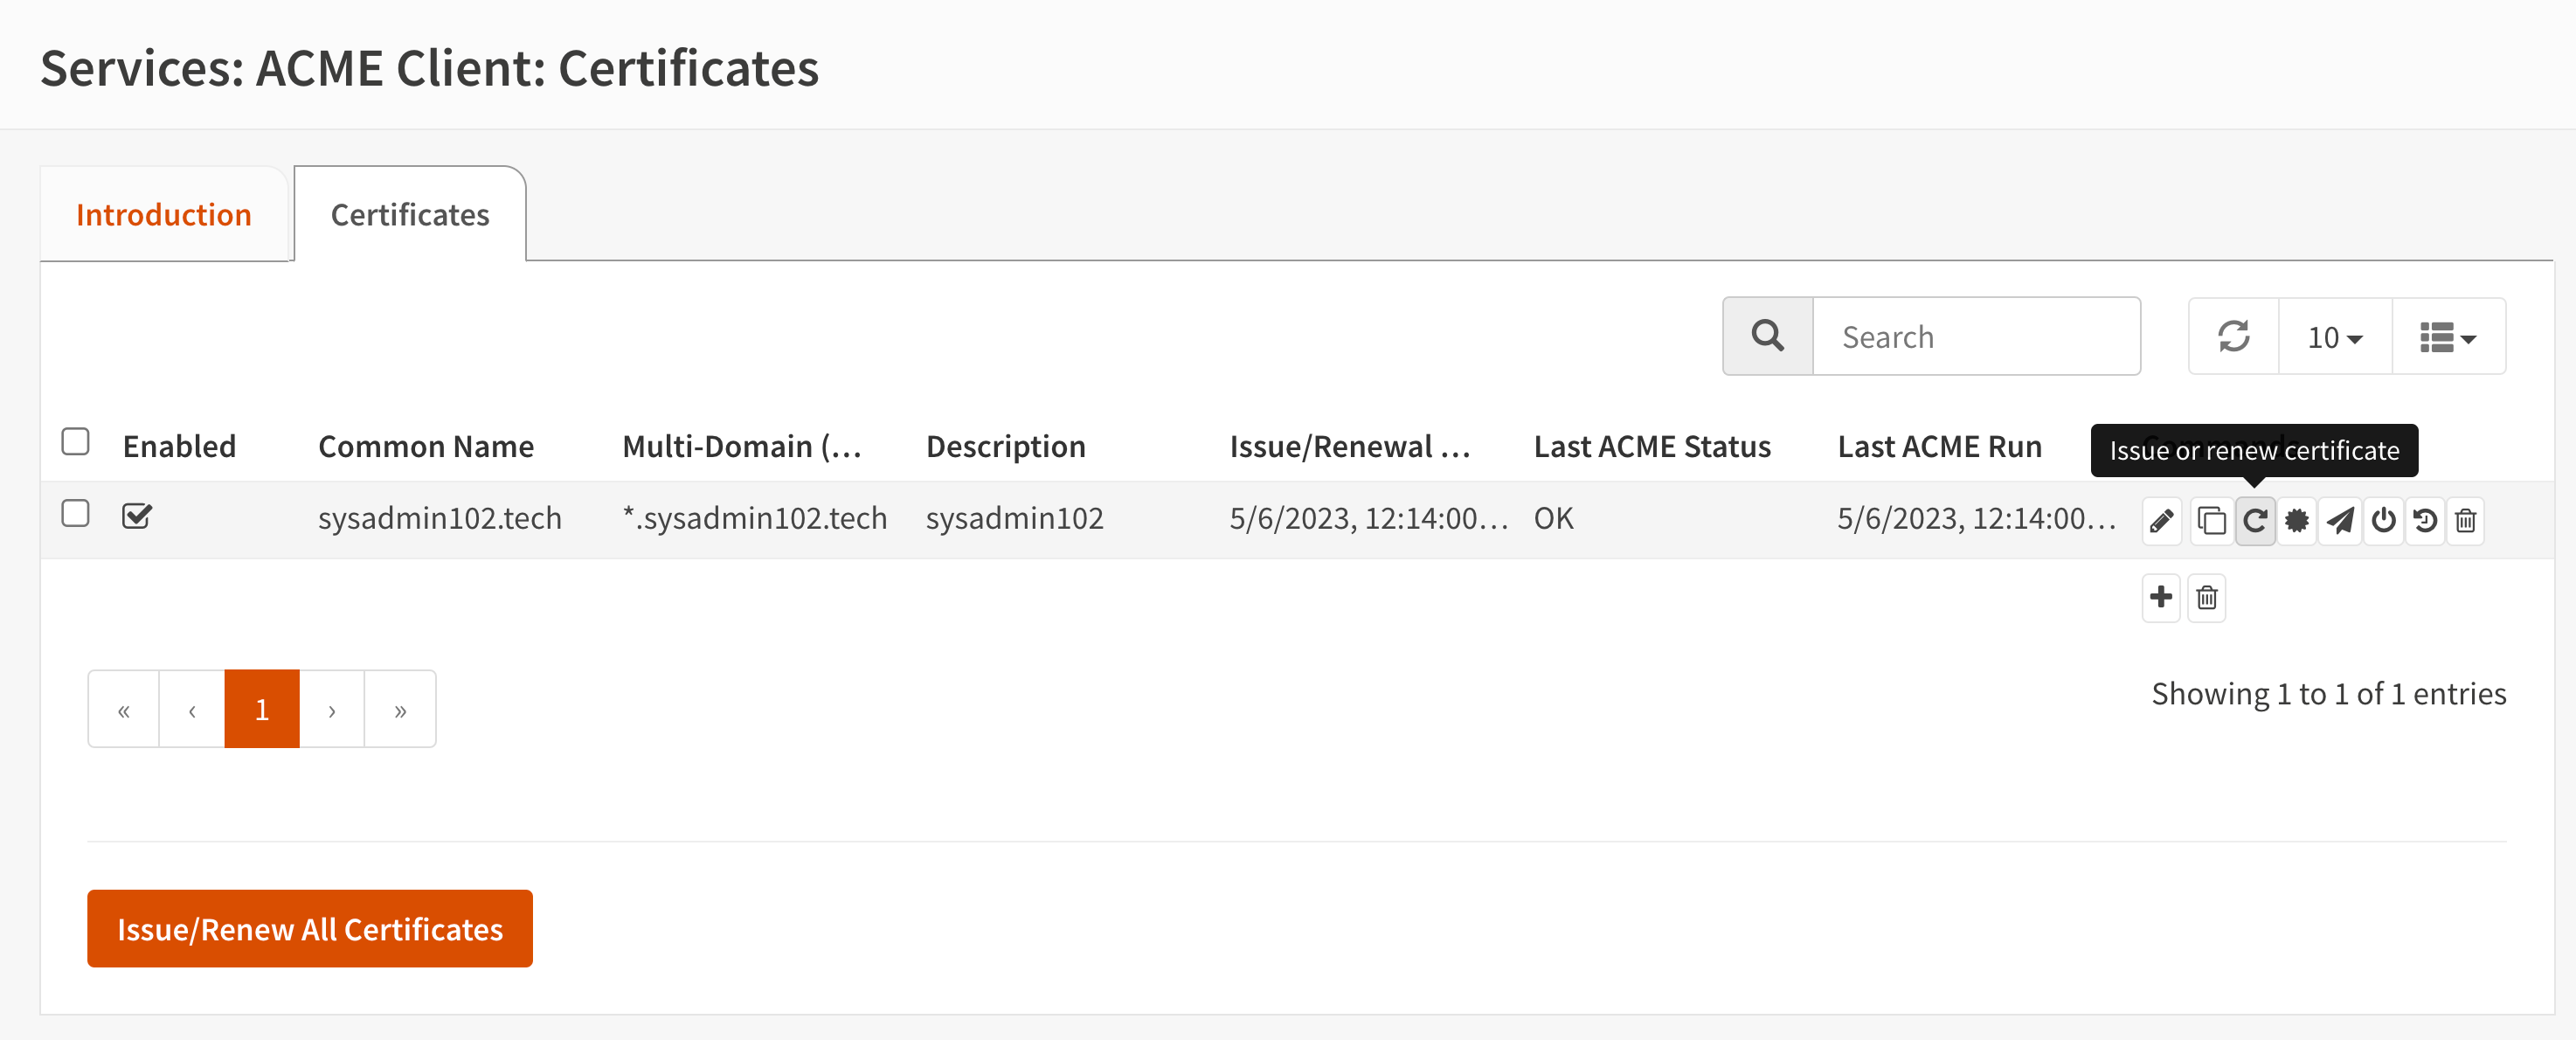
If everything is correctly configured. You will see the Issue/Renewal date and Last ACME Status as OK.

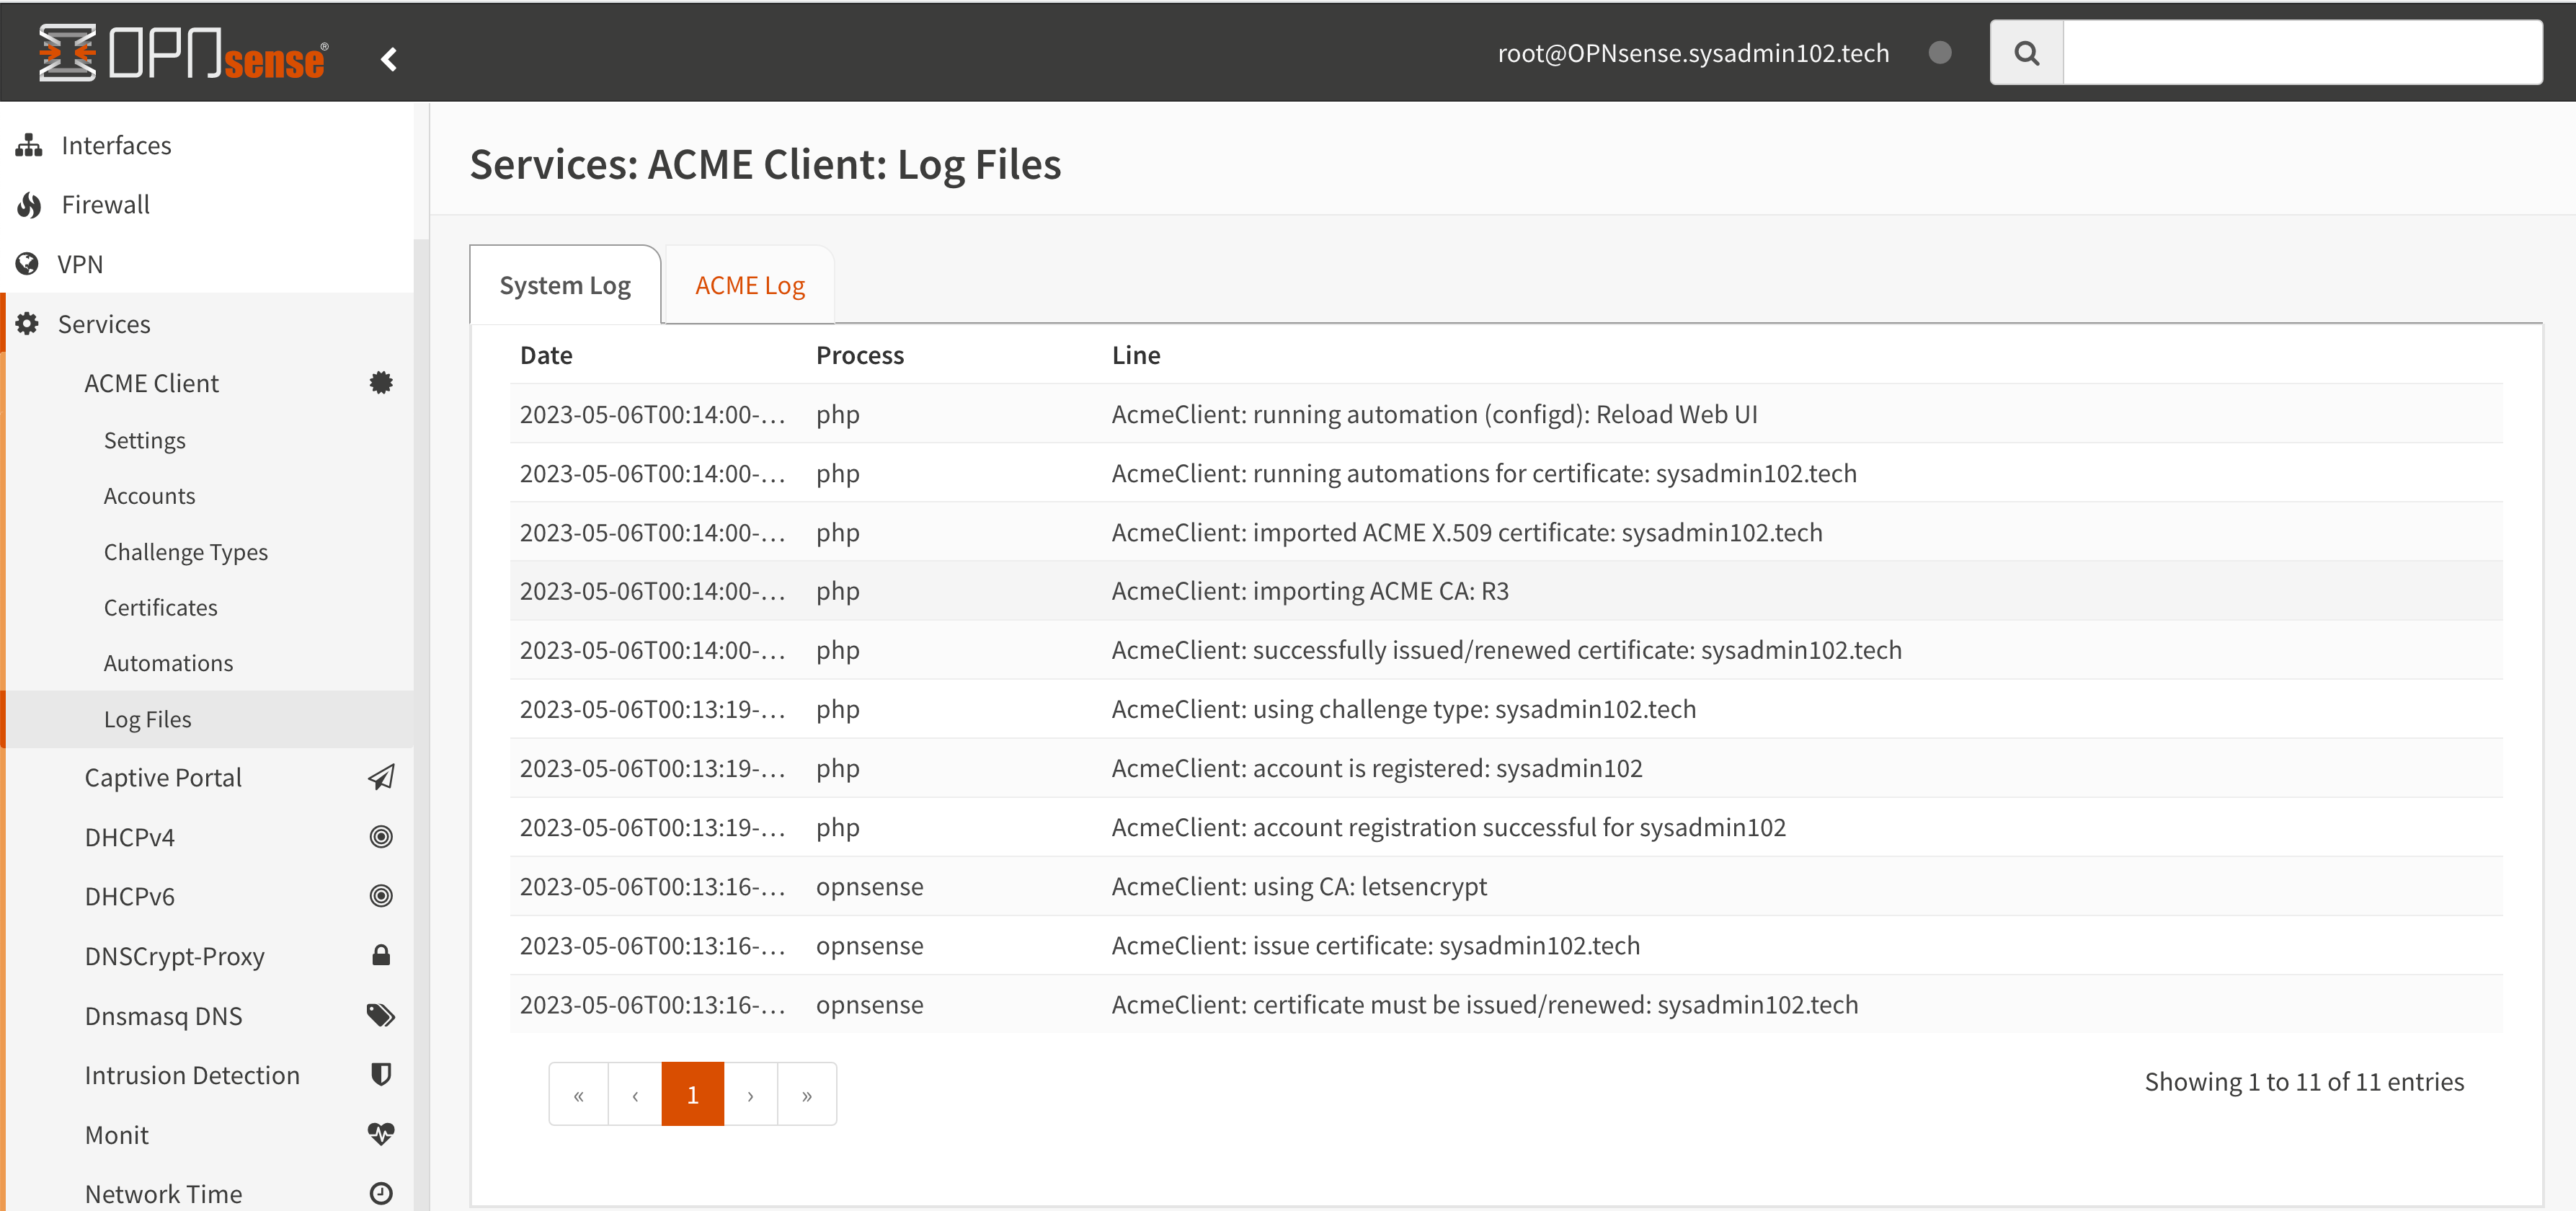
If not, you can troubleshoot this by auditing the log files under Services > ACME Client > Log Files
Once the test run is working, we will go back to Services > ACME Client > Accounts > Select Accounts and change the Let’s Encrypt Test CA to Let’s Encrypt. Select the pencil icon under Commands to edit the Account. Select Save when done.

After that, you will need to reissue the certificate with the production certificate authority by navigating to Services > ACME Client > Certificates > Select Certificates. Select the third icon under Commands to issue/renew a certificate.
Lastly, you will navigate to System > Settings > Administration > Select the new ACME (client) certificate from the drop-down list. Scroll down and select Save when finished.

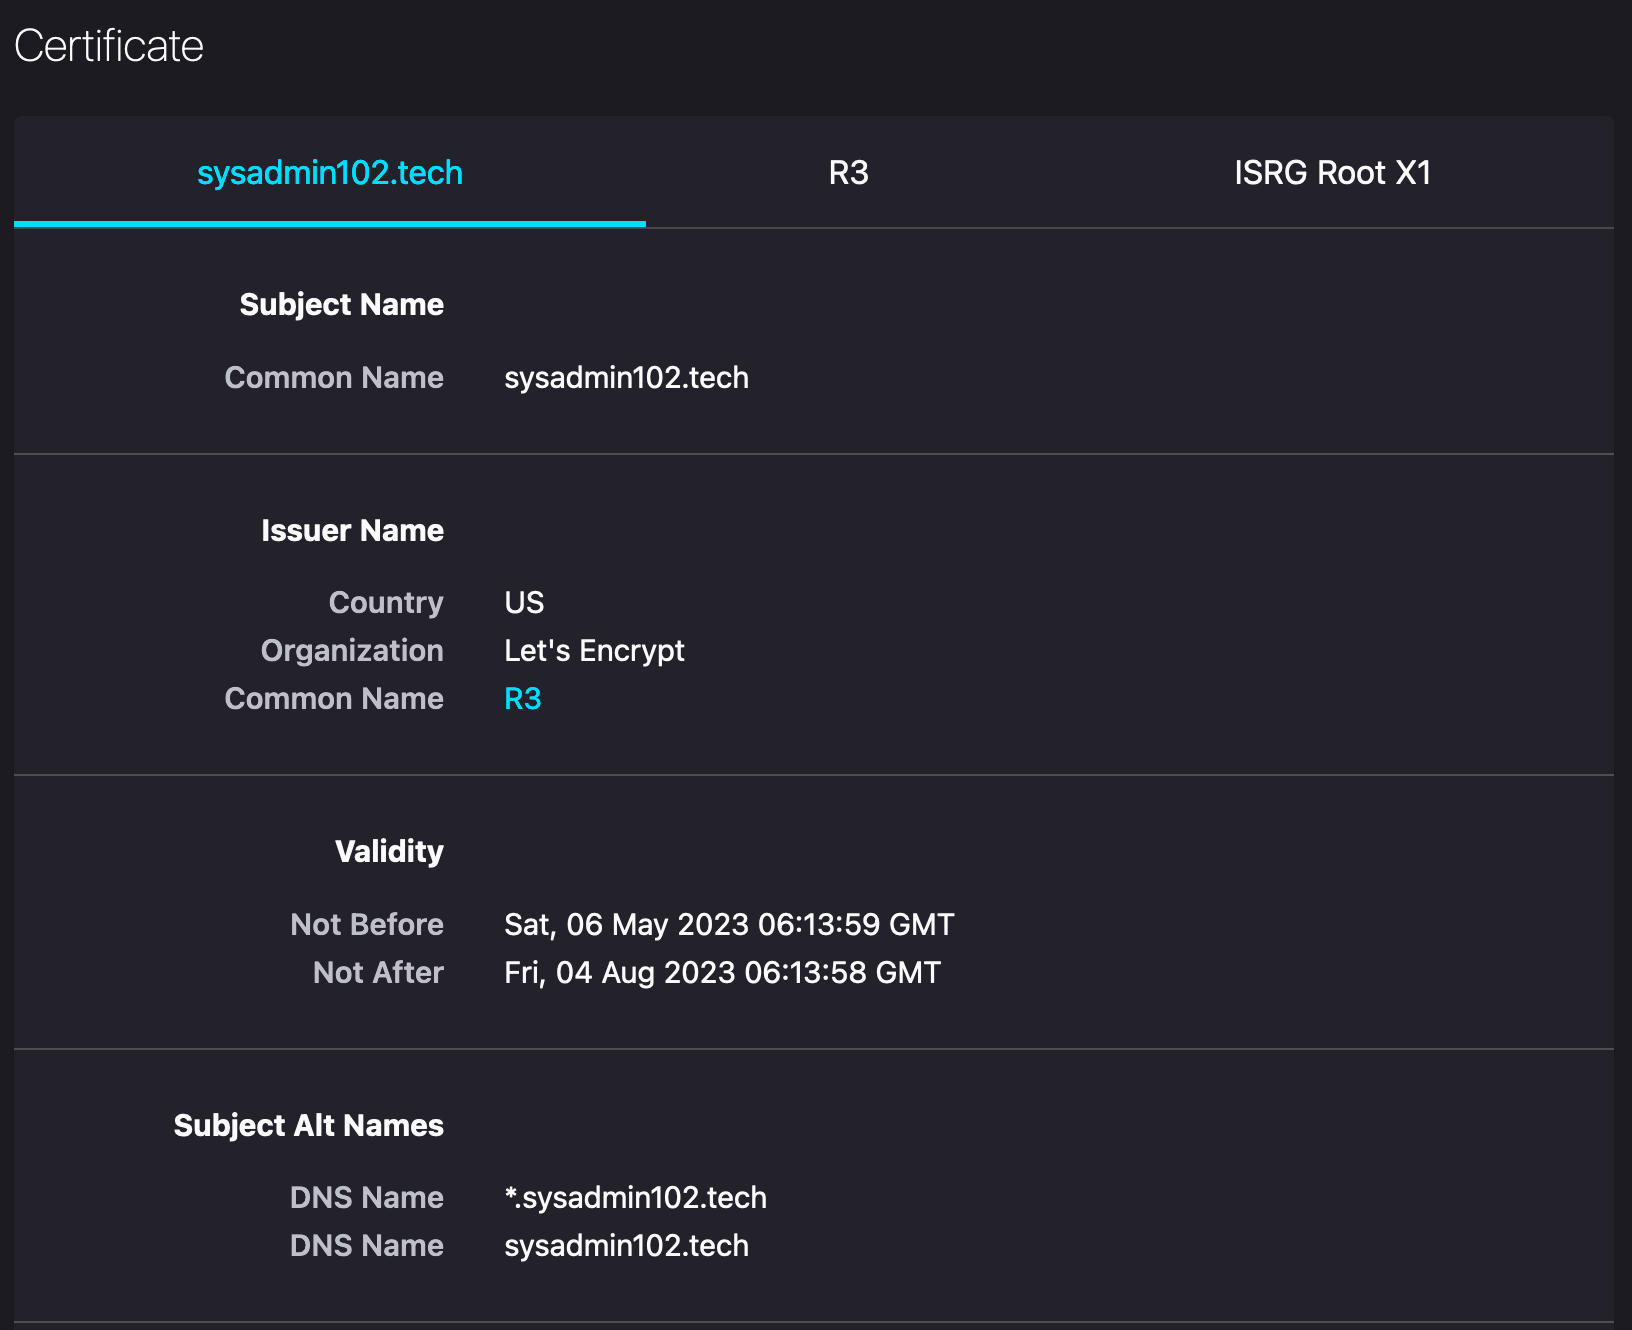
Reopen your OPNsense login portal or refresh it and you will see the “not secured” icon is gone. You now have a Let’s Encrypt wild card certificate.